Scenario:
Make: Cisco
Model: Cisco ASA 5500-X series [ASA 5506-X, ASA 5506W-X, ASA 5508-X, ASA 5516-X etc.]
Version: ASA 9.x or later, ASDM 7.x or later
Mode: CLI and GUI [ASDM]
Description: In this article, we will discuss a stepwise method of how to configure IP SLA monitoring and route tracking on a Cisco ASA firewall, so that traffic automatically fails over to a backup ISP link when the primary link goes down, and returns when it recovers.
How IP SLA Works on Cisco ASA
An ASA with two internet connections normally keeps sending traffic out of the primary link, even if the ISP behind it has stopped working, because the interface itself is still up. IP SLA solves this:
- SLA monitor – the ASA regularly pings a reliable target, such as a public DNS server, through the primary link.
- Track object – follows the result of the SLA monitor: up while the pings succeed, down when they fail.
- Tracked default route – the primary default route is linked to the track object. When the track goes down, the ASA removes this route.
- Floating backup route – a second default route via the backup ISP with a higher administrative distance. It is only used when the primary route is removed.
When the pings succeed again, the primary route returns and traffic moves back automatically.
Example Values Used in This Guide
| Item | Primary ISP | Backup ISP |
| ASA interface | GigabitEthernet0/1 (outside) | GigabitEthernet0/2 (backup) |
| ASA IP address | 203.0.113.10/24 | 198.51.100.10/24 |
| ISP gateway | 203.0.113.1 | 198.51.100.1 |
| Route administrative distance | 1 (tracked) | 254 (floating) |
| Monitored target | 8.8.8.8 via outside | – |
Replace these with your own ISP details.
Method 1: Configure IP SLA Using the CLI
Step 1: Connect to the ASA
Connect over SSH or the console and enter configuration mode. If SSH is not set up yet, see Configure SSH On Cisco ASA Firewall CLI.
Step 2: Configure Both WAN Interfaces
edledge-asa# configure terminal
edledge-asa(config)# interface GigabitEthernet0/1
edledge-asa(config-if)# nameif outside
edledge-asa(config-if)# security-level 0
edledge-asa(config-if)# ip address 203.0.113.10 255.255.255.0
edledge-asa(config-if)# no shutdown
edledge-asa(config-if)# exit

edledge-asa(config)# interface GigabitEthernet0/2
edledge-asa(config-if)# nameif backup
edledge-asa(config-if)# security-level 0
edledge-asa(config-if)# ip address 198.51.100.10 255.255.255.0
edledge-asa(config-if)# no shutdown
edledge-asa(config-if)# exit
Step 3: Create the SLA Monitor
Create SLA monitor 123 that pings 8.8.8.8 through the outside interface every 10 seconds, sending 3 packets each time, then start it:
edledge-asa(config)# sla monitor 123
edledge-asa(config-sla-monitor)# type echo protocol ipIcmpEcho 8.8.8.8 interface outside
edledge-asa(config-sla-monitor-echo)# num-packets 3
edledge-asa(config-sla-monitor-echo)# frequency 10
edledge-asa(config-sla-monitor-echo)# exit
edledge-asa(config)# sla monitor schedule 123 life forever start-time now
Step 4: Create the Track Object
Link track object 1 to the SLA monitor:
edledge-asa(config)# track 1 rtr 123 reachabilityStep 5: Add the Routes
Add the tracked primary default route, the floating backup default route, and a host route that keeps the monitored target on the primary link:
edledge-asa(config)# route outside 0.0.0.0 0.0.0.0 203.0.113.1 1 track 1
edledge-asa(config)# route backup 0.0.0.0 0.0.0.0 198.51.100.1 254
edledge-asa(config)# route outside 8.8.8.8 255.255.255.255 203.0.113.1 1
Important Note: The backup route must point to the backup interface. A common mistake is to configure both default routes on the outside interface, in which case the failover never works. The host route for 8.8.8.8 makes sure the monitor always tests the primary ISP, even while traffic is on the backup link.
Step 6: Add NAT for the Backup Interface
Users can only browse through the backup link if the ASA also translates their traffic on that interface. If your inside network is 192.168.10.0/24, for example:
edledge-asa(config)# object network INSIDE-NET-BACKUP
edledge-asa(config-network-object)# subnet 192.168.10.0 255.255.255.0
edledge-asa(config-network-object)# nat (inside,backup) dynamic interface
edledge-asa(config-network-object)# exit
Step 7: Speed Up Failover for Existing Connections (Recommended)
Without this, existing connections can stay stuck on the failed link. This setting moves them to the new best route after 30 seconds:
edledge-asa(config)# timeout floating-conn 0:00:30
edledge-asa(config)# exit
edledge-asa# write memory
Method 2: Configure IP SLA Using ASDM (GUI)
Step 1: Log In to ASDM
Open ASDM and log in to the ASA.

Step 2: Configure the WAN Interfaces
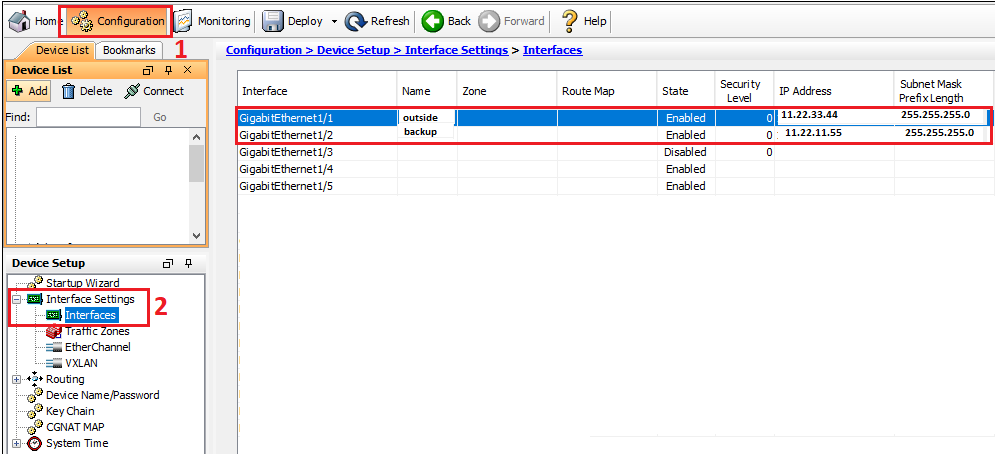
Go to “Configuration” > “Device Setup” > “Interface Settings” > “Interfaces” and configure the two WAN interfaces, named outside and backup, with security level 0 and their ISP IP addresses.
Step 3: Add the Primary Default Route
Go to “Configuration” > “Device Setup” > “Routing” > “Static Routes” and click “Add”. Select the outside interface, network any4 (0.0.0.0/0), the primary ISP gateway, and a metric (administrative distance) of 1.

Step 4: Enable Route Tracking
In the same window, under Options, select “Tracked”. Enter a Track ID (for example 1), an SLA ID (for example 123) and the target IP to monitor (for example 8.8.8.8) through the outside interface.

Step 5: Set the Monitoring Options
Click “Monitoring Options” and set how often the ASA checks the target. For example, a frequency of 10 seconds and 3 packets per check. Click “OK”.

Step 6: Add the Backup Default Route
Add a second static route on the backup interface, network any4, with the backup ISP gateway and a metric of 254. Do not enable tracking on this route.

Step 7: Check the Routes, Apply and Save
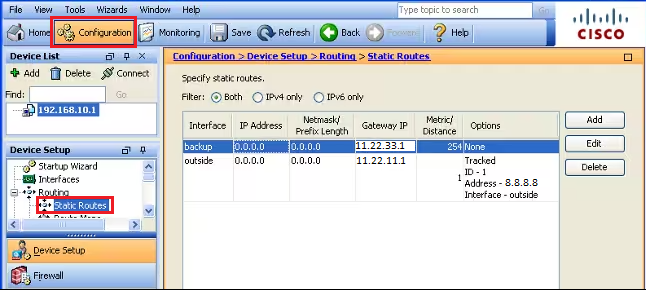
The static routes list should now show both default routes: the primary with metric 1 and tracking, and the backup with metric 254. Remember to add the NAT rule for the backup interface (see Step 6 of the CLI method), then click “Apply” and “Save”.
Verify and Test the Failover
Check that the monitor and track are working:
edledge-asa# show sla monitor operational-state 123
edledge-asa# show track 1
edledge-asa# show route | include 0.0.0.0
show track 1 should show Reachability is Up, and the routing table should show only the primary default route via the outside interface.
To test the failover, disconnect the primary ISP cable during a maintenance window, or have the ISP block the monitored target. Within about 30 seconds, show track 1 should show Down and the default route should switch to the backup interface. Reconnect the primary link and confirm that the route returns.
Troubleshooting
- Failover does not happen – check that the backup route uses the backup interface and that the primary route includes track 1.
- Track stays down even though the primary ISP works – the ISP or target may block ICMP. Use a different target, such as your ISP gateway or another public DNS server, and check that icmp replies are not blocked by an access rule.
- Failover happens but users have no internet – the NAT rule for the backup interface is missing.
- Some connections still hang after failover – configure timeout floating-conn as shown above, or clear old connections with clear conn.
- Site-to-Site VPN does not move to the backup link – the crypto map and IKE must also be enabled on the backup interface, and the remote peer must accept the backup IP. See Cisco ASA Site-to-Site IPsec VPN Configuration.
Frequently Asked Questions
Which IP should I monitor with IP SLA?
Use a reliable address beyond your ISP, such as a public DNS server (8.8.8.8 or 1.1.1.1). Monitoring only the ISP gateway may not detect problems further inside the ISP’s network.
Why use an administrative distance of 254 for the backup route?
A higher value makes the route less preferred, so the ASA only uses it when the primary route is removed. Any value higher than the primary route works; 254 is a common choice.
Does the ASA switch back automatically?
Yes. As soon as the monitored target responds again through the primary link, the tracked route is restored and traffic returns to the primary ISP.
For a dedicated guide on redundant internet links, see Configure Redundant or Backup ISP Link on Cisco ASA – CLI and Configure Redundant or Backup WAN/ISP Link on Cisco ASA – GUI.
Disclaimer: This article is for educational purposes only and is not professional financial, medical, or legal advice. It may contain affiliate links, which earn us a small commission at no extra cost to you. See our Disclaimer and Affiliate Disclosure.
Article ID: EA00129