

Scenario:
Make: Cisco
Model: ASA 5506-X, ASA 5506 W-X, ASA 5508-X, Cisco ASA 5500 Series
Mode: GUI [Graphical User Interface]
Version: ASA version 9.x or later, ASDM version 7.x or later
Description: In this article, we will discuss the stepwise method of how to configure Redundant or Backup ISP links on Cisco ASA Firewalls. Here Cisco ASA will use a static route tracking feature to enable the device to use redundant or backup Internet connections. Redundant or Backup Links can be configured via CLI method as well.
Introduction
It is always recommended to have redundant internet services to counter the situations in case one ISP goes down. Here we will discuss how to configure an ASA for two ISPs to work as an automatic failover in case the primary internet line goes down. The configuration that is described in this article cannot be used for load balancing or load sharing, as it is not supported on the Cisco ASA. We will use SSH or CLI and ASDM or GUI methods on ASA.
Configuration – GUI
Step1: Login
Log in to the ASA using username and password.

[ays_quiz id=’2′]
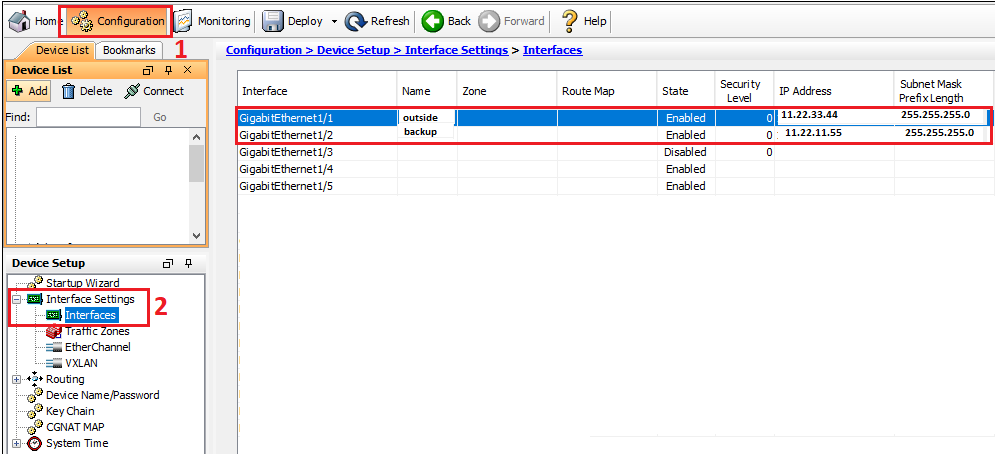
Step2: WAN Interfaces
Configure both WAN links on two different interfaces of the ASA. You could name those two interfaces as “outside” and “backup“.
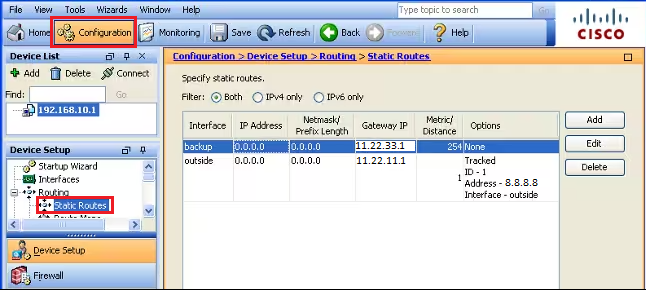
Step3: Routing
Add static routing for the Primary Internet line [WAN]. Here in this case, “outside” interface is the primary WAN, and “backup” is the secondary WAN. Follow the steps as shown below in the image.

Step4: Tracking
While adding a route for the primary WAN, add tracing, and follow the steps as shown below.

Step5: Monitoring Option
While adding static route and tracking, click “Monitoring Options” in the previous step and add monitoring details as per requirement.

Step6: Routing for Secondary WAN
Add the static route of secondary WAN and keep the matrix to a maximum (recommended is 254).

Step7: Verify Configuration
Verify the configuration and ensure routing is added.
Now when the primary internet will be down then the secondary internet will kicks-in to route the traffic. This can be verified by below mentioned step.
Step8: Confirm Routing
To check and confirm via which internet provider the routing is going out, follow the step shown below in the image.

After the primary ISP fails, the route is removed and the backup route is installed. The DEFAULT route now points to 11.22.11.1 through the backup interface:

As shown above, as soon the primary internet goes down the secondary internet kicks-in to route the traffic. This will help to minimize the downtime in the network.
Other important topics
- How to Configure VPN Between Microsoft Azure & Cisco ASA
- Add Static ARP or MAC Binding on Cisco ASA Firewall
- How to Configure SNMP on Cisco ASA 5500-X Firewalls
- Cisco ASA Site-to-Site IPSec VPN Tunnel Configuration-GUI
- Cisco ASA IOS Upgrade/Downgrade GUI
Source: Knowledge Base, Internet, Cisco
EA00126