Scenario:
Make: Cisco
Model: Cisco ASA 5500-X [ASA 5506-X, ASA 5506W-X, ASA 5508-X, ASA 5516-X etc.] and Firepower appliances running ASA software
Mode: GUI [ASDM] and CLI [Command Line Interface]
Description: In this article, we will discuss a stepwise method of how to configure SNMP v2c and SNMP v3 on Cisco ASA firewalls using ASDM and the CLI, so that a monitoring system such as Zabbix, PRTG, SolarWinds or LibreNMS can poll the firewall and receive traps.
SNMP on Cisco ASA: What You Need to Know
SNMP (Simple Network Management Protocol) lets a monitoring server collect information from network devices, such as CPU and memory usage, interface status, traffic and VPN tunnels. On a Cisco ASA, SNMP works in two directions:
- Polling – the monitoring server queries the ASA on UDP port 161.
- Traps – the ASA sends alerts (for example an interface going down) to the monitoring server on UDP port 162.
Keep these points in mind before you start:
- SNMP on the ASA is read-only. The ASA does not support SNMP write (SET) operations, so SNMP cannot be used to change its configuration.
- The ASA only answers listed hosts. Every monitoring server must be added as an SNMP host, on the interface through which it reaches the firewall.
- Use SNMP v3 where possible. SNMP v1 and v2c send the community string in clear text. SNMP v3 adds authentication and encryption.
| Version | Security | Recommended Use |
| SNMP v1 | Community string, clear text | Legacy only; avoid |
| SNMP v2c | Community string, clear text | Internal networks with older monitoring tools |
| SNMP v3 | Username, authentication and encryption | Recommended for all new deployments |
Method 1: Configure SNMP Using ASDM (GUI)
Step 1: Log in to ASDM
Open Cisco ASDM and log in to the ASA with an administrator account. If ASDM access is not yet set up, refer to Configure ASDM Access On Cisco ASA Firewall CLI.

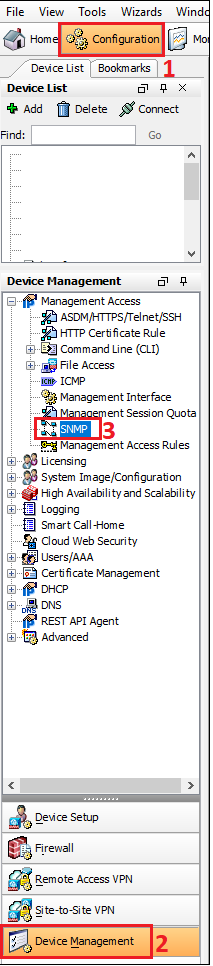
Step 2: Open the SNMP Settings
Go to “Configuration” > “Device Management” > “Management Access” > “SNMP”.
Step 3: Set the Community, Contact and Location
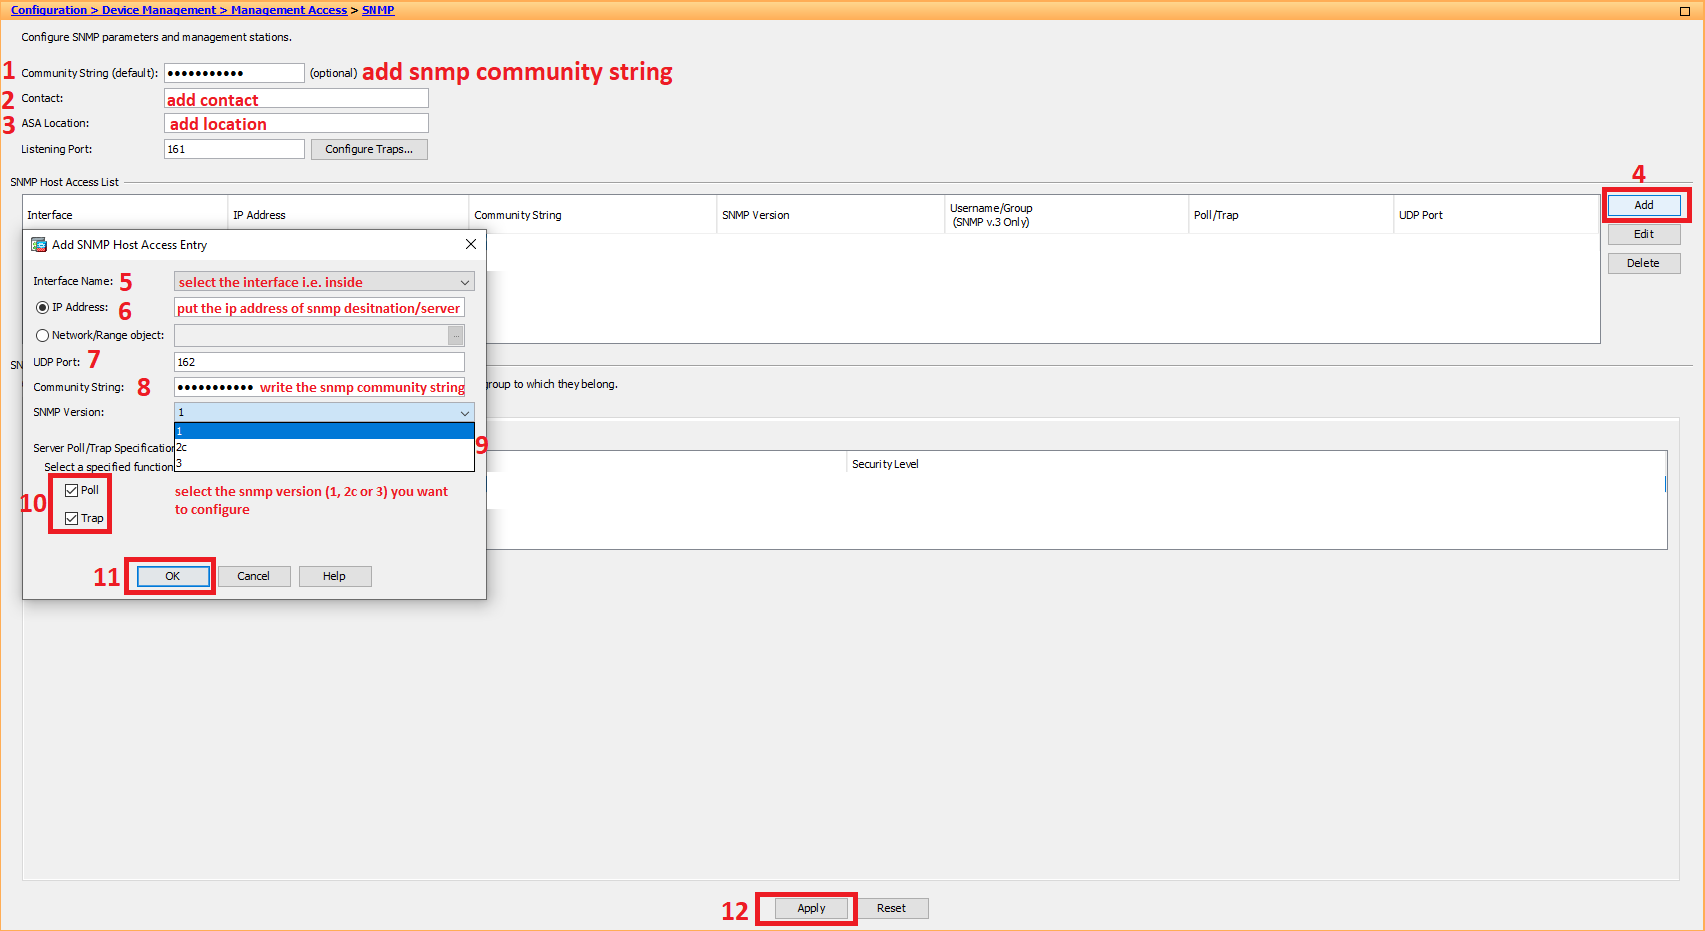
Fill in the general SNMP settings:
- Community String (default): the SNMP v1/v2c community string. Use a long, random value, never “public”.
- Contact: the person or team responsible for the firewall.
- ASA Location: the physical location, for example the data centre or rack name.
Step 4: Add the SNMP Host (Monitoring Server)
Under “SNMP Management Stations”, click “Add” and enter:
- Interface Name: the ASA interface the monitoring server is connected through (for example inside or management).
- IP Address: the IP address of the SNMP / monitoring server.
- UDP Port: the port on the server that receives traps. Leave it at the default 162 unless your server uses a different port. The ASA itself always listens for polling on UDP 161.
- Community String: the community string for this host, if it differs from the default.
- SNMP Version: 1, 2c or 3.
- Server Poll/Trap Specification: select Poll, Trap or both.
Click “OK”, then “Apply”.
If you are using SNMP v2c, the configuration is complete. For SNMP v3, continue with the next two steps.
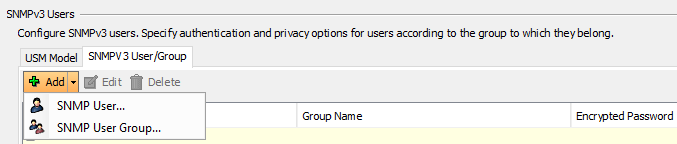
Step 5: Create the SNMP v3 Group (USM Model)
Under “SNMPv3 Users” or the “USM Model” section, add a group. Enter a group name of your choice and select the security level:
- Authentication and Encryption (priv) – recommended.
- Authentication only (auth) – passwords are protected but data is not encrypted.
- No authentication (noauth) – not recommended.

Step 6: Create the SNMP v3 User
Add a user, assign it to the group from Step 5, and set the authentication algorithm (SHA) and encryption algorithm (AES) with their passwords. Then edit the SNMP host from Step 4, set the version to 3 and select this user. Click “OK” and “Apply”.
Important Note: After applying the changes, click “Save” in ASDM (or run write memory on the CLI). Otherwise, the SNMP configuration will be lost when the firewall reboots.
Method 2: Configure SNMP Using the CLI
The same configuration can be done in a few commands from the CLI. Connect to the ASA over SSH or console and enter configuration mode. If SSH is not configured yet, see Configure SSH On Cisco ASA Firewalls.
SNMP v2c Configuration
In this example, the monitoring server is 192.168.1.50 on the inside interface:
configure terminal
snmp-server location DC1-Rack-05
snmp-server contact network-team@example.com
snmp-server host inside 192.168.1.50 community Str0ngC0mmunity version 2c
snmp-server enable traps snmp authentication linkup linkdown coldstart
write memory
To allow only polling or only traps from that server, add the poll or trap keyword after the IP address, for example snmp-server host inside 192.168.1.50 poll community Str0ngC0mmunity version 2c.
SNMP v3 Configuration
configure terminal
snmp-server group SNMP-GROUP v3 priv
snmp-server user snmpuser SNMP-GROUP v3 auth sha AuthPassw0rd priv aes 128 PrivPassw0rd
snmp-server host inside 192.168.1.50 version 3 snmpuser
snmp-server enable traps snmp authentication linkup linkdown coldstart
write memory
Replace the community string, usernames and passwords with your own strong values. Newer ASA versions also support stronger algorithms such as SHA-256 and AES-256.
Verify the Configuration
On the ASA, check the SNMP configuration and counters:
show running-config snmp-server
show snmp-server host
show snmp-server statistics
From the monitoring server, test polling with snmpwalk (Linux):
snmpwalk -v2c -c Str0ngC0mmunity 192.168.1.1 system

snmpwalk -v3 -l authPriv -u snmpuser -a SHA -A AuthPassw0rd -x AES -X PrivPassw0rd 192.168.1.1 system
Replace 192.168.1.1 with the IP address of the ASA interface facing the monitoring server. If the command returns the ASA’s system name, description and uptime, SNMP is working. You can now add the firewall to your monitoring system.
Troubleshooting
- No response to snmpwalk – make sure the server is added as an SNMP host on the correct interface. The ASA ignores SNMP requests from any address that is not listed.
- Polling the wrong interface IP – the server must poll the IP address of the interface it is connected to. The ASA does not answer SNMP on a different interface’s IP address.
- Timeout through another firewall – allow UDP 161 from the server to the ASA and UDP 162 from the ASA to the server on any device in between.
- Community string mismatch – the string is case-sensitive and must match exactly on both sides.
- SNMP v3 authentication errors – check that the username, security level, authentication and encryption algorithms and both passwords match on the ASA and the monitoring server. Check the counters in show snmp-server statistics.
- Traps not received – confirm the traps are enabled with snmp-server enable traps, the host is not set to poll only, and the server is listening on UDP 162.
Frequently Asked Questions
Which port does SNMP use on Cisco ASA?
The ASA listens for SNMP polling on UDP port 161 and sends traps to UDP port 162 on the monitoring server by default.
Can I change the ASA configuration using SNMP?
No. SNMP on the Cisco ASA is read-only. Use ASDM or the CLI to make configuration changes.
Should I use SNMP v2c or v3?
Use SNMP v3 with authentication and encryption whenever your monitoring system supports it. Use v2c only on trusted internal networks, with a strong community string.
Disclaimer: This article is for educational purposes only and is not professional financial, medical, or legal advice. It may contain affiliate links, which earn us a small commission at no extra cost to you. See our Disclaimer and Affiliate Disclosure.
Article ID: EA00114