Scenario:
Make: Cisco Switches
Model: Cisco Catalyst 2960, 3650, 3850, 9200, 9300 and other IOS / IOS-XE switches
Mode: CLI [Command Line Interface]
Description: In this article, we will discuss how to configure a port-channel (EtherChannel) on Cisco switches using LACP or PAgP, how to configure the switch on the other side, how to verify the bundle with show etherchannel summary, and how to troubleshoot common problems. For Dell switches, see Port-Channel/Channel Group Configuration – Dell Switches. You can test this on GNS3 (Graphical Network Simulator-3) before implementing it in a production environment.
What Is a Port-Channel (EtherChannel)?
EtherChannel is the Cisco technology that groups several physical links into one logical link. The logical interface created on the switch is called a port-channel. Bundling links gives you more bandwidth and redundancy: if one cable fails, traffic continues over the remaining links, and Spanning Tree treats the bundle as a single link instead of blocking the extra ports. To learn more about the terms, see Port-Channel/Channel Group vs EtherChannel/Link Aggregation.
LACP, PAgP or On: Choosing the Channel Mode
active    - Enable LACP unconditionally
passive   - Enable LACP only if a LACP device is detected
desirable - Enable PAgP unconditionally
auto      - Enable PAgP only if a PAgP device is detected
on - Enable EtherChannel only (no negotiation protocol)- LACP (active / passive) – the open IEEE 802.3ad standard. Use it in most cases, and always when connecting to non-Cisco devices such as servers, firewalls or Dell switches.
- PAgP (desirable / auto) – a Cisco-proprietary protocol. It only works between Cisco devices.
- On – forces the bundle without any negotiation. Both sides must be set to on, and misconfigurations are not detected, so avoid it unless the other device does not support LACP.
At least one side must start the negotiation: active–active and active–passive work for LACP, but passive–passive never forms a bundle. The same applies to PAgP with desirable and auto.
Before You Start
All member ports must have the same settings on both switches, or they will be suspended from the bundle:
- Same speed and duplex.
- Same switchport mode (all access or all trunk).
- Same access VLAN, or the same allowed VLANs and native VLAN on trunks.
- LACP supports up to 8 active ports per bundle, with up to 8 more in hot-standby.
In this example, we bundle Gi1/0/8 and Gi2/0/8 into Port-channel 1 as a trunk using LACP. The two ports are on different members of a switch stack, so the port-channel stays up even if one stack member fails.
Configuration Steps
Step 1: Access the Switch
Connect to the switch over SSH or the console cable, log in and enter privileged mode.
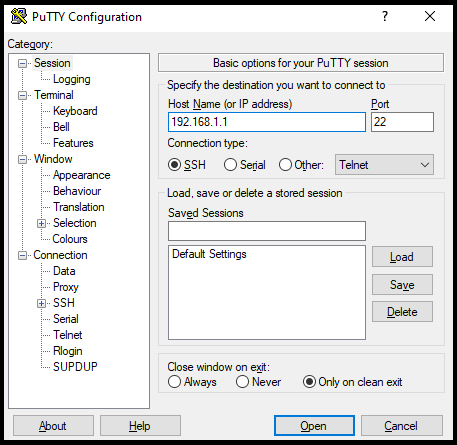
login as: admin
Using keyboard-interactive authentication.
Password:
edledge-switch>enable
Password:
edledge-switch#
If SSH fails with a key exchange error, see “Couldn’t agree a key exchange algorithm” SSH Error with Putty.
Step 2: Check the Member Ports
Make sure the ports are free and have matching settings:
edledge-switch#show interfaces status
edledge-switch#show running-config interface gig 1/0/8
edledge-switch#show running-config interface gig 2/0/8
Step 3: Configure the Member Ports
Configure both ports at once with interface range. Apply the switchport settings first, then add the ports to the channel group:
edledge-switch#conf t
edledge-switch(config)#interface range gig 1/0/8 , gig 2/0/8
edledge-switch(config-if-range)#switchport mode trunk
edledge-switch(config-if-range)#channel-group 1 mode active
Creating a port-channel interface Port-channel 1
edledge-switch(config-if-range)#exit
On older multilayer switches such as the Catalyst 3560 or 3750, run switchport trunk encapsulation dot1q before switchport mode trunk. Newer switches support only 802.1Q, so the command is not needed.
Step 4: Configure the Port-Channel Interface
Settings on the port-channel interface apply to the whole bundle. Restricting the allowed VLANs is optional but recommended:
edledge-switch(config)#interface port-channel 1
edledge-switch(config-if)#description Uplink-to-Core
edledge-switch(config-if)#switchport mode trunk
edledge-switch(config-if)#switchport trunk allowed vlan 10,20,30
edledge-switch(config-if)#exit
edledge-switch(config)#exit
Step 5: Configure the Neighbor Switch
Repeat the same configuration on the switch at the other end of the cables, using its own port numbers. The mode, trunk settings and allowed VLANs must match:
core-switch#conf t
core-switch(config)#interface range gig 1/0/1 - 2
core-switch(config-if-range)#switchport mode trunk
core-switch(config-if-range)#channel-group 1 mode active
core-switch(config-if-range)#exit
core-switch(config)#interface port-channel 1
core-switch(config-if)#switchport mode trunk
core-switch(config-if)#switchport trunk allowed vlan 10,20,30
core-switch(config-if)#end
The port-channel number only has local meaning, so it does not need to match between switches, but using the same number makes troubleshooting easier.
Step 6: Verify the Port-Channel
The quickest check is show etherchannel summary:
edledge-switch#show etherchannel summary
Flags:  D - down        P - bundled in port-channel
        I - stand-alone s - suspended
        H - Hot-standby (LACP only)
        R - Layer3      S - Layer2
        U - in use      f - failed to allocate aggregator

Number of channel-groups in use: 1
Number of aggregators:           1

Group  Port-channel  Protocol    Ports
------+-------------+-----------+-----------------------------------------------
1      Po1(SU)         LACP      Gi1/0/8(P)  Gi2/0/8(P)
Po1(SU) means the port-channel is Layer 2 and in use, and (P) next to each port means it is bundled. For more detail, check the port-channel interface:
edledge-switch#show interfaces port-channel 1 etherchannel
Port-channel1 (Primary aggregator)

Age of the Port-channel = 0d:0h:5m:14s
Logical slot/port = 9/1 Number of ports = 2
HotStandBy port = null
Port state = Port-channel Ag-Inuse
Protocol = LACP
Port security = Disabled

Ports in the Port-channel:

Index Load Port    EC state   No of bits
------+------+------+------------------+-----------
  0     00   Gi1/0/8  Active      0
  0     00   Gi2/0/8  Active      0
To confirm that the neighbor switch is negotiating LACP, run show lacp neighbor.
Step 7: Adjust Load Balancing (Optional)
Traffic is shared across the links based on a hash. Using source and destination IP usually spreads traffic more evenly than the default MAC-based method:
edledge-switch(config)#port-channel load-balance src-dst-ip
edledge-switch(config)#exit
edledge-switch#show etherchannel load-balance
Step 8: Save the Configuration
edledge-switch#write memory
Building configuration...
[OK]
Troubleshooting
- Port shows (s) – suspended – its settings do not match the other members or the port-channel, usually speed, duplex, trunk mode or allowed VLANs. Compare the configs with show running-config interface.
- Port shows (I) – stand-alone – the neighbor is not responding with LACP. Check that the other side is configured and that the mode pairing is valid (not passive–passive).
- Port shows (D) – down – a physical problem. Check the cable, SFP and that the interface is not shut down.
- Ports go err-disabled with “channel-misconfig” – EtherChannel guard detected that one side is bundled and the other is not. Fix the configuration on both sides, then run shutdown and no shutdown on the port-channel.
- MAC flapping messages after the change – often caused by one side being bundled while the other still uses separate links. See %SW_MATM-4-MACFLAP_NOTIF or MAC Flapping Cisco Switch.
Frequently Asked Questions
What is the difference between EtherChannel and port-channel?
EtherChannel is the technology that bundles the links, and the port-channel is the logical interface you configure on the switch to represent that bundle.
Should I use LACP or PAgP?
Use LACP. It is an open standard that works with any vendor, while PAgP only works between Cisco devices.
Can I create a Layer 3 port-channel?
Yes, on multilayer switches. Run no switchport on the member ports and the port-channel interface, then assign an IP address to the port-channel interface.
Since a port-channel changes how Spanning Tree sees your links, it is also worth reading Spanning Tree Protocol – STP. To secure switch access, configure RADIUS Authentication on Cisco Switches. For firmware, see Firmware or IOS Upgrade of Cisco Switches and what to do if the IOS upgrade fails.
Disclaimer: This article is for educational purposes only and is not professional financial, medical, or legal advice. It may contain affiliate links, which earn us a small commission at no extra cost to you. See our Disclaimer and Affiliate Disclosure.
Article ID: EA00098