
Scenario
Switch: Cisco 2960, 3650, etc
Server: Radius Server 2012, 2016, 2019
Description: This article is to discuss and show, how to configure Radius authentication for clients on the Cisco Switch stack. This configuration is valid for other Cisco switches as well.
Step1: Configure aaa model on the switch to allow AAA
This is important to configure aaa model on the switch to allow Radius to control Authentication, Authorization and Accounting.
edledge-switch(config)#aaa new-modelStep2: Configure aaa group and Radius Server
Once aaa model is configured now we would need to configure the radius group of the Radius server.
edledge-switch (config)#aaa group server radius EDL
edledge-switch (config-edledge-radius)# server name edledge-server
edledge-switch (config-edledge-radius)# deadtime 1
Step3: Configure Authentication, Authorization & Accounting
edledge-switch (config)#aaa authentication login default local group EDL
edledge-switch (config)#aaa authentication dot1x default group EDL
edledge-switch (config)#aaa authorization network default group EDL
edledge-switch (config)#aaa accounting dot1x default start-stop group EDL
Step4: Now Configure Radius Server Details On the Switch
edledge-switch (config)#radius server edledge-server
edledge-switch (config-radius-server)#address ipv4 10.1.11.11 auth-port 1812 acct-port 1813
edledge-switch (config-radius-server)# key edledge

Save this key safe, as we will need this key when this switch (host) will be added to the server.
Now time to add a host (switch) to the server so that the Radius server starts authenticating hosts as per Radius Policies. Radius policies are defined on the radius server which controls the connection as per defined policy.
Step5: Login to Radius server and open Server Manager and then NPS
mstsc ==> Radius server ==> Server Manager ==> Network Policy ServerStep6: Add Host (Switch) to Radius Server
Right click on "Radius Clients" and then click "New"
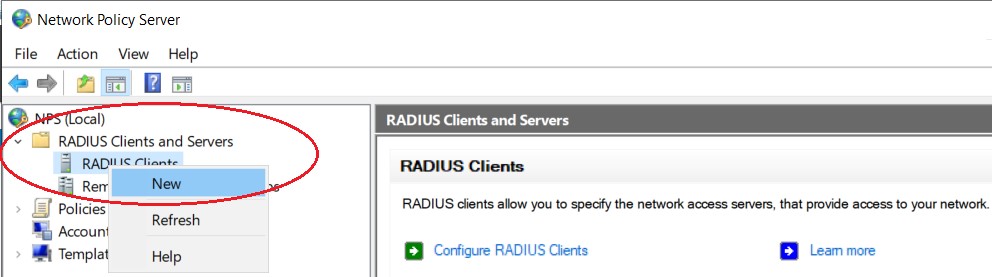
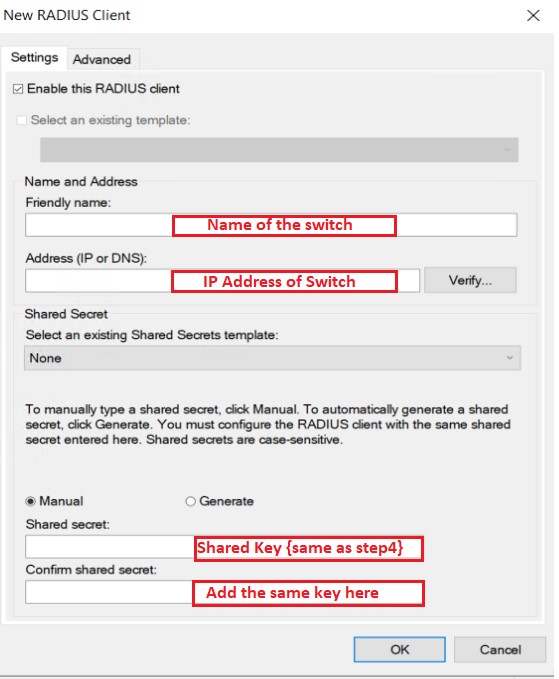
Step7: Add host (Switch) to the Radius server
Name of the switch - edledge-switch
IP address of the switch - 10.1.1.1
Key - The same key we had used in Step 4 [key = edledge]


Press "OK" to save.
Step8: Ensure hostname with correct IP is now visible in the host file name.
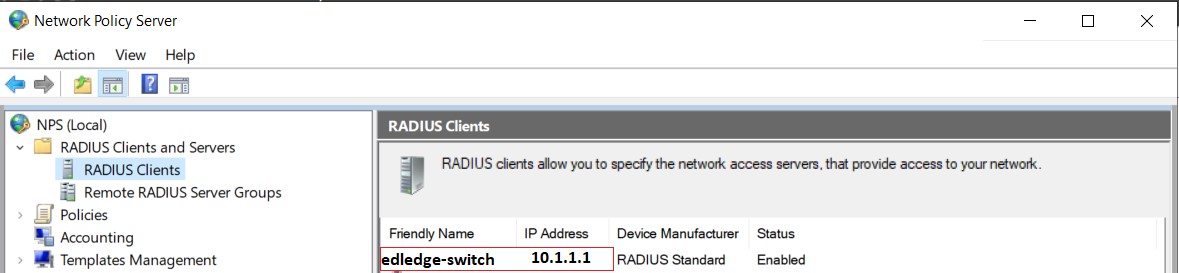
The switch is all for the test set and added to the Radius server. Make sure the switch is able to ping the Radius server and once Policies are added to the Server, we are good to go.
It is always recommended in the IT industry to have redundancy for every service so that the downtime will have either very minor or no impact at all. We can configure Radius Fail-over Configuration On Cisco Switch as well which will allow redundancy of the Radius server. So If one server is down or not available authentication can be down via a secondary Radius Server.
Source: Cisco, Lab, Knowledge Base
EA00021