Scenario:
Make: Microsoft
Model: Azure VPN Gateway
Mode: Azure Portal [Graphical User Interface]
Description: In this article, we will discuss a stepwise method of how to configure a Site-to-Site IPsec VPN on Microsoft Azure, so that your on-premises network (office or data centre) can securely reach the virtual machines and services in your Azure virtual network.
How a Site-to-Site VPN on Azure Works
A Site-to-Site (S2S) VPN builds a permanent, encrypted IPsec tunnel between your on-premises firewall and Azure. Once the tunnel is up, devices on both sides talk to each other using private IP addresses, as if Azure were another branch office.
On the Azure side, you need four components:
- Virtual network (VNet) – the private network in Azure where your virtual machines live.
- Gateway subnet – a dedicated subnet that Azure uses for the VPN gateway.
- Virtual network gateway – the Azure VPN device, with its own public IP address.
- Local network gateway – a record in Azure that describes your on-premises firewall: its public IP and the subnets behind it.
Finally, a connection joins the virtual network gateway and the local network gateway using a pre-shared key (PSK).
This guide is for Site-to-Site VPN. If you want individual users to connect to Azure from their laptops, that is a Point-to-Site VPN, which uses a different setup.
Prerequisites
- An Azure subscription with permission to create network resources.
- An on-premises VPN device or firewall (for example SonicWall, Cisco ASA or FortiGate) with a static public IP address.
- IP ranges that do not overlap between Azure and your on-premises network. Overlapping subnets are the most common reason a tunnel connects but traffic does not flow.
- Outbound and inbound UDP ports 500 and 4500 allowed on your on-premises firewall, plus IP protocol 50 (ESP) if the device is not behind NAT.
Example IP Plan Used in This Guide
| Item | Example Value |
| Azure virtual network | VNET-01 – 10.10.0.0/16 |
| Azure workload subnet | 10.10.1.0/24 |
| Gateway subnet | 10.10.255.0/27 |
| On-premises network | 192.168.1.0/24 |
| On-premises firewall public IP | 203.0.113.10 |
Replace these with your own values. Keep a note of them, because you will need the same details on the on-premises side.
Note: The screenshots below were taken in an earlier version of the Azure portal. Menu names and layouts may look slightly different today, but the settings are the same.
Configuration
Step 1: Sign in to the Azure Portal
Log in to https://portal.azure.com with an account that has permission to create network resources.
Step 2: Create a Virtual Network
Search for “Virtual networks” in the top search bar and click “Create”. Select your subscription, create or choose a resource group, give the network a name (for example VNET-01) and choose the region closest to your users.

Step 3: Set the Address Space and Subnet
On the “IP addresses” tab, enter the address space for the virtual network (for example 10.10.0.0/16) and add a subnet for your virtual machines (for example 10.10.1.0/24). Click “Review + create” and then “Create”.

Step 4: Add the Gateway Subnet
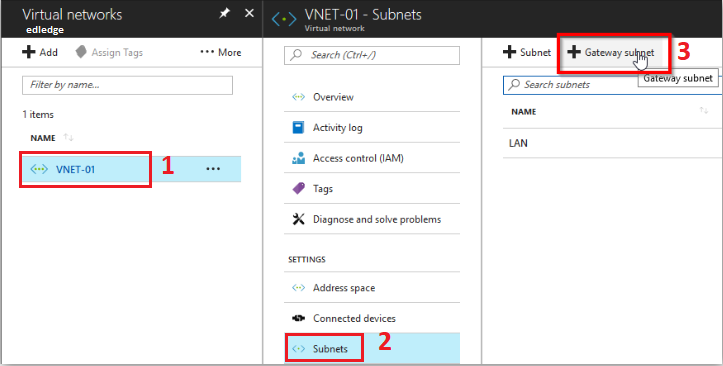
Open the virtual network you just created, go to “Subnets” and add a “Gateway subnet”. In newer portal versions, click “+ Subnet” and set the subnet purpose to “Virtual Network Gateway”. The name must be exactly GatewaySubnet. Use a /27 or larger (for example 10.10.255.0/27), and click “Save”.
Important Note: Do not place virtual machines or any other resources in the GatewaySubnet, and do not attach a network security group (NSG) to it. Azure reserves this subnet for the VPN gateway only.
Step 5: Create the Virtual Network Gateway
Search for “Virtual network gateways” and click “Create”. Fill in the details as follows:
- Gateway type: VPN
- VPN type: Route-based (recommended; it supports IKEv2 and most firewalls)
- SKU: choose based on the throughput and number of tunnels you need; VpnGw1 is a common starting point
- Virtual network: select the virtual network created in Step 2
- Public IP address: create a new one and give it a name
Click “Review + create” and then “Create”.

Important Note: Provisioning a virtual network gateway can take 30 to 45 minutes. Wait until the deployment finishes and the gateway shows a public IP address. You will need this public IP when configuring the VPN on your on-premises firewall. Also note that Azure bills VPN gateways by the hour from the moment they are created, even when no traffic passes, so delete test gateways you no longer need.
Step 6: Create the Local Network Gateway
Search for “Local network gateways” and click “Create”. Enter a name (for example Office-Firewall), the public IP address of your on-premises firewall (for example 203.0.113.10), and the on-premises address space (for example 192.168.1.0/24). Add every on-premises subnet that needs to reach Azure. Click “Review + create” and then “Create”.
Step 7: Open Connections
Once the virtual network gateway is ready, open it (for example “edledge-virtual-gateway”), click “Connections” and then “+ Add”.

Step 8: Create the Site-to-Site Connection
Set the connection type to “Site-to-site (IPsec)”, select the local network gateway created in Step 6, and enter a strong shared key (PSK). Leave the IKE protocol as IKEv2 unless your firewall only supports IKEv1. Click “OK” or “Create”.

The shared key must match exactly on both sides. Copy it somewhere safe, as you will enter the same key on your on-premises firewall.
Step 9: Configure the On-Premises Firewall
The Azure side is now ready. Next, create the matching IPsec tunnel on your firewall, using the Azure gateway public IP, the same shared key, and the Azure address space as the remote network. Follow the guide for your device:
- How to Configure VPN Between Microsoft Azure & SonicWall Firewall
- How to Configure VPN Between Microsoft Azure & Cisco ASA
Step 10: Verify the Tunnel
In the Azure portal, open the connection you created. The status should change to Connected, and the “Data in” and “Data out” counters should increase when traffic flows. Test by pinging or connecting to a virtual machine in Azure from your on-premises network. Remember that Windows virtual machines block ping by default in Windows Defender Firewall.
Troubleshooting
If the connection stays at “Not connected” or “Connecting”, check these common causes:
- Shared key mismatch – the PSK must be identical on Azure and on the firewall, including capital letters and special characters.
- Wrong public IP – confirm the local network gateway uses your firewall’s current public IP, and the firewall points to the Azure gateway’s public IP.
- IKE version or policy mismatch – make sure both sides use the same IKE version (IKEv2 is recommended) and compatible encryption, integrity and DH group settings. You can set a custom IPsec/IKE policy on the Azure connection if needed.
- Blocked ports – UDP 500 and UDP 4500 must be allowed between the two public IPs. See the full list of TCP and UDP ports.
- Overlapping or missing subnets – the Azure address space and the on-premises address space must not overlap, and every subnet that needs access must be listed on both sides.
- Policy-based device – some older firewalls only support policy-based VPNs. In that case, enable “Use policy based traffic selectors” on the Azure connection.
Frequently Asked Questions
How long does it take to create an Azure VPN gateway?
Usually 30 to 45 minutes. The rest of the configuration takes only a few minutes.
Should I choose route-based or policy-based VPN?
Choose route-based. It is recommended by Microsoft, supports IKEv2 and multiple tunnels, and works with almost all modern firewalls.
Does an Azure VPN gateway cost money when it is idle?
Yes. Azure charges for the gateway per hour based on its SKU, plus outbound data transfer, regardless of whether the tunnel is in use.
Disclaimer: This article is for educational purposes only and is not professional financial, medical, or legal advice. It may contain affiliate links, which earn us a small commission at no extra cost to you. See our Disclaimer and Affiliate Disclosure.
Article ID: EA00120