Scenario:
Make: Cisco
Model: Cisco ASA 5500-X series [ASA 5506-X, ASA 5506W-X, ASA 5508-X, ASA 5516-X etc.] and Firepower appliances running ASA software
Version: ASA software 8.4 and above (IKEv2 support), ASDM 7.x
Mode: GUI [ASDM] and CLI [Command Line Interface]
Description: In this article, we will discuss a stepwise method of how to configure a Site-to-Site IPsec VPN tunnel on a Cisco ASA firewall using ASDM, explain what each setting does, and provide the equivalent CLI configuration, verification commands and troubleshooting tips.
Before You Start: Plan the Tunnel
Both ends of a Site-to-Site VPN must use matching settings, so agree on them with the remote side before configuring anything. The example values below are used throughout this guide:
| Setting | Local Site (This ASA) | Remote Site |
| Public (peer) IP | 198.51.100.10 | 203.0.113.20 |
| Protected network | 192.168.10.0/24 | 10.20.0.0/24 |
| IKE version | IKEv2 | IKEv2 |
| Phase 1 (IKE) | AES-256, SHA-256, DH group 14, 86400 s | Same |
| Phase 2 (IPsec) | AES-256, SHA-256, PFS group 14, 28800 s | Same |
| Pre-shared key | Same strong key on both sides | Same |
Also make sure that the two protected networks do not overlap, and that UDP ports 500 and 4500 and IP protocol 50 (ESP) are not blocked between the two public IPs.
Configure the Tunnel Using ASDM (GUI)
Step 1: Log in to ASDM
Open Cisco ASDM and log in to the ASA. If ASDM access is not set up yet, see Configure ASDM Access On Cisco ASA Firewall CLI.

Step 2: Open Site-to-Site VPN
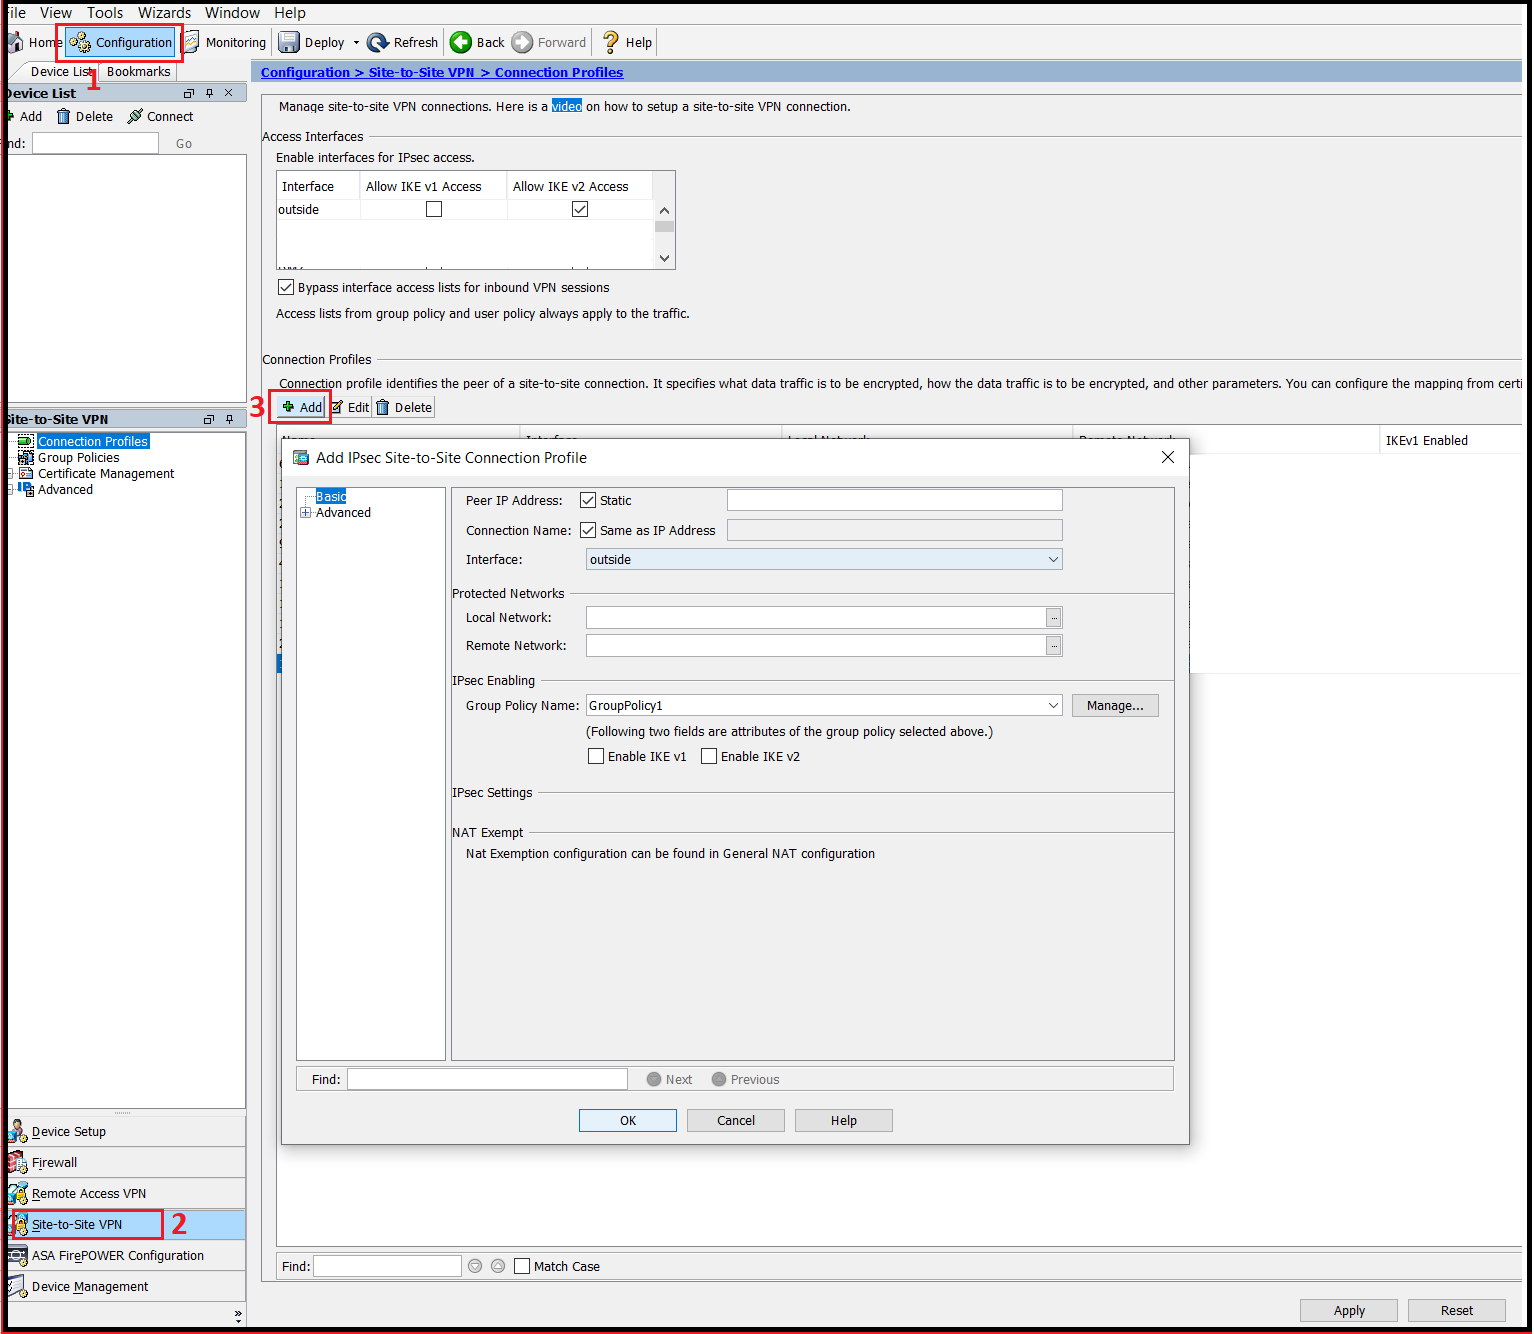
Go to “Configuration” > “Site-to-Site VPN” > “Connection Profiles”. In the Access Interfaces section at the top, tick Allow IKE v2 access (and IKE v1 if needed) for the outside interface. Then click “Add” to create a new connection profile.
Step 3: Configure the Basic Settings
The first page of the new connection profile contains the main settings:
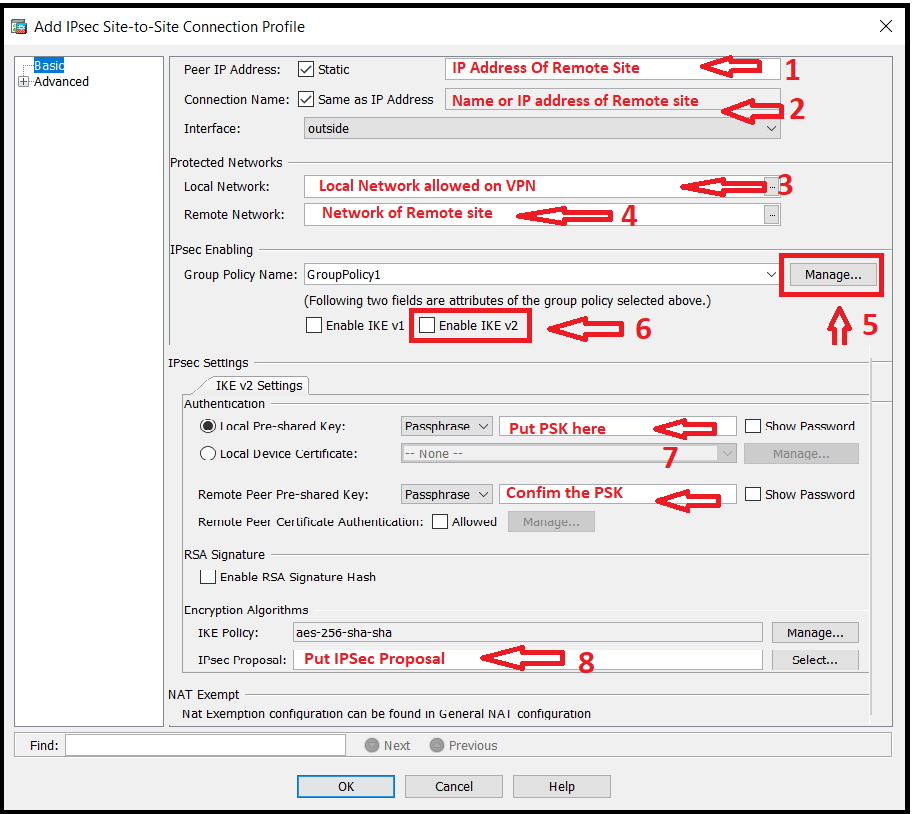
- Peer IP Address – the public IP address of the remote firewall, for example 203.0.113.20.
- Interface – the interface facing the internet, usually outside.
- Protected Networks – Local Network is your LAN behind this ASA (192.168.10.0/24) and Remote Network is the LAN behind the remote firewall (10.20.0.0/24). Only traffic between these networks is sent through the tunnel. These must be the mirror image of the remote side’s settings.
- IKE Version – tick IKE version 2. Use IKEv1 only if the remote device does not support IKEv2.
- Pre-shared Key – for IKEv2, enter the Local and Remote pre-shared keys. In most setups, both are the same key, and it must match the remote side exactly.
- IKE Policy and IPsec Proposal – click “Manage” / “Select” and choose the encryption, integrity and DH group agreed in your plan.
ASDM also creates a Group Policy for the tunnel. Make sure it allows the IKE version you are using:

Important Note: Tick “Exempt ASA side host/network from address translation” and select the inside interface, if this option is shown in your ASDM version. Without a NAT exemption, the tunnel may come up but traffic will not pass, because the ASA translates the local addresses before encrypting them.
Step 4: Crypto Map Entry (Advanced)
Click “Advanced” > “Crypto Map Entry”:

- Priority – the sequence number of this tunnel in the crypto map. Lower numbers are checked first; each tunnel needs a unique number.
- Perfect Forward Secrecy (PFS) – enable it and select the same DH group as the remote side (for example group 14). Both sides must match.
- NAT-T – keep NAT Traversal enabled. It allows the tunnel to work when either side is behind a NAT device, using UDP 4500.
- Reverse Route Injection – enable it only if you run a dynamic routing protocol that should learn the remote network.
- Security Association Lifetime – how often the tunnel renews its keys. 28800 seconds (8 hours) is a common value; match the remote side.
Step 5: Tunnel Group Settings (Advanced)
Click “Advanced” > “Tunnel Group”:
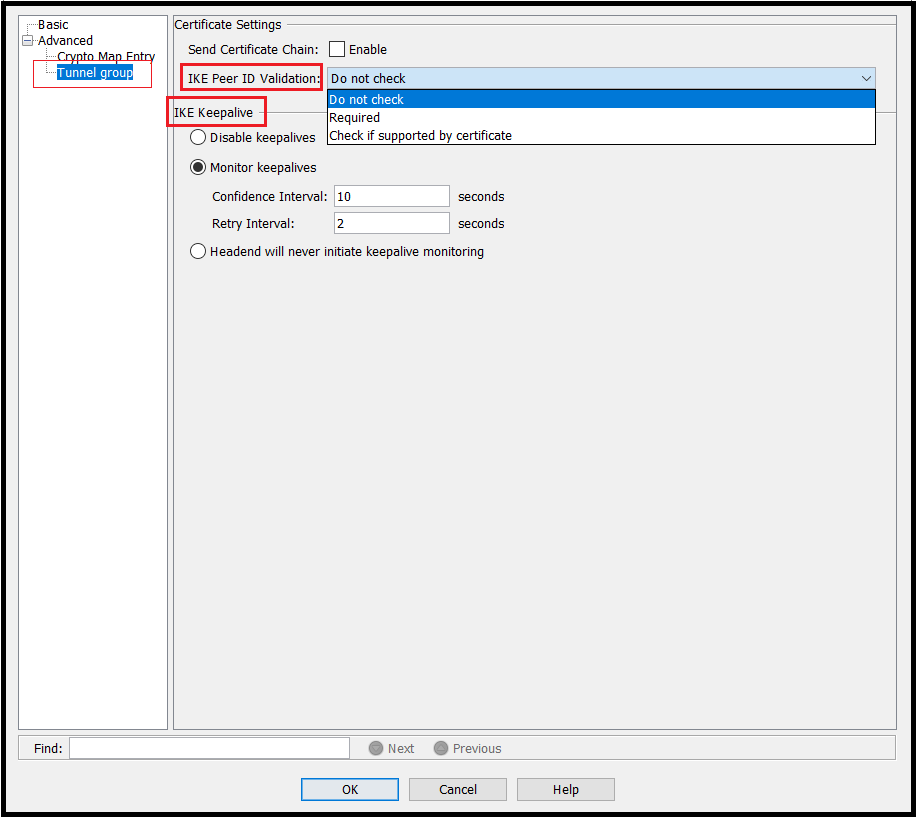
- IKE Peer ID Validation – “Required” is the default. Choose “Do not check” only if the remote device uses an identity that the ASA cannot validate.
- IKE Keepalive – keep it enabled (Dead Peer Detection) with a confidence interval of about 10 seconds and a retry interval of about 2 seconds, so a dead tunnel is detected and rebuilt quickly.
Step 6: Apply and Save
Click “OK”, then “Apply”, and finally “Save” to write the configuration to memory.
Now configure the matching tunnel on the remote firewall. If the remote side is also a Cisco ASA, repeat these steps with the local and remote values swapped. For Azure, see How to Configure VPN Between Microsoft Azure & Cisco ASA.
Equivalent CLI Configuration (IKEv2)
The same tunnel configured from the CLI, using the example values from the plan above:
! Objects for the local and remote networks
object network LOCAL-LAN
 subnet 192.168.10.0 255.255.255.0
object network REMOTE-LAN
 subnet 10.20.0.0 255.255.255.0

! Interesting traffic and NAT exemption
access-list VPN-TO-SITE2 extended permit ip object LOCAL-LAN object REMOTE-LAN
nat (inside,outside) source static LOCAL-LAN LOCAL-LAN destination static REMOTE-LAN REMOTE-LAN no-proxy-arp route-lookup

! Phase 1 (IKEv2 policy)
crypto ikev2 policy 10
 encryption aes-256
 integrity sha256
 group 14
 prf sha256
 lifetime seconds 86400
crypto ikev2 enable outside

! Phase 2 (IPsec proposal)
crypto ipsec ikev2 ipsec-proposal AES256-SHA256
 protocol esp encryption aes-256
 protocol esp integrity sha-256

! Crypto map
crypto map outside_map 10 match address VPN-TO-SITE2
crypto map outside_map 10 set peer 203.0.113.20
crypto map outside_map 10 set ikev2 ipsec-proposal AES256-SHA256
crypto map outside_map 10 set pfs group14
crypto map outside_map 10 set security-association lifetime seconds 28800
crypto map outside_map interface outside

! Group policy and tunnel group
group-policy GP-203.0.113.20 internal
group-policy GP-203.0.113.20 attributes
 vpn-tunnel-protocol ikev2
tunnel-group 203.0.113.20 type ipsec-l2l
tunnel-group 203.0.113.20 general-attributes
 default-group-policy GP-203.0.113.20
tunnel-group 203.0.113.20 ipsec-attributes
 ikev2 remote-authentication pre-shared-key Str0ngSharedKey
 ikev2 local-authentication pre-shared-key Str0ngSharedKey

write memory
Important Note: If the outside interface already has a crypto map (for example from another VPN tunnel), use the existing crypto map name with a new, unused sequence number. An interface can only have one crypto map, and applying a new one replaces the old one and drops the existing tunnels.
Verify the Tunnel
The tunnel only comes up when traffic tries to use it. Start a ping from a device in the local network to a device in the remote network, then check:
show crypto ikev2 sa
show crypto ipsec sa peer 203.0.113.20
show vpn-sessiondb l2l
show crypto ikev2 sa should show the peer with status READY, and show crypto ipsec sa should show the encaps and decaps counters increasing. You can also simulate traffic without a real client using packet-tracer:
packet-tracer input inside icmp 192.168.10.10 8 0 10.20.0.10 detailedTroubleshooting
- Phase 1 does not come up – check the peer IP, pre-shared key, IKE version and IKE policy on both sides, and that UDP 500 and 4500 are allowed between the public IPs.
- Phase 1 is up but Phase 2 fails – the protected networks (crypto ACLs) or IPsec proposals do not match. Each side’s local network must equal the other side’s remote network exactly.
- Tunnel is up but no traffic passes – the NAT exemption is missing, or a route or access rule is blocking traffic. Use packet-tracer to see where packets are dropped.
- Only one side can start the tunnel – check that the far end also has a matching crypto ACL and NAT exemption.
- Tunnel drops regularly – compare the SA lifetimes and keepalive/DPD settings on both sides.
Frequently Asked Questions
Should I use IKEv1 or IKEv2?
Use IKEv2 whenever both devices support it. It is more secure, more reliable and recommended by Cisco. Use IKEv1 only for older remote devices.
Why is my Cisco ASA VPN tunnel not showing as up?
ASA tunnels are on-demand. They only appear in show crypto output after interesting traffic has tried to cross them, so start a ping first.
Can I configure more than one Site-to-Site tunnel on the same ASA?
Yes. Each tunnel gets its own connection profile, crypto ACL and a unique sequence number in the same crypto map.
In case you are having issues configuring ASDM Access and/or SSH Access on Cisco ASA, please follow the linked articles. If you are looking to upgrade the ASA software, see Cisco ASA Firmware Upgrade – CLI and Cisco ASA Firmware Upgrade – GUI. You may also find Configure IP SLA on Cisco ASA Firewalls and Cisco ASA Active/Standby Failover Configuration useful.
Disclaimer: This article is for educational purposes only and is not professional financial, medical, or legal advice. It may contain affiliate links, which earn us a small commission at no extra cost to you. See our Disclaimer and Affiliate Disclosure.
Article ID: EA00069