
v2, Last Updated: 03-Feb-2026
Scenario
Make: Ubiquiti
Model: Ubiquiti Controller
Version: Controller Version 10.0.160
Description: This article explains step by step how to log in to the Ubiquiti UniFi guest Wi-Fi network using a voucher in 2026, based on UniFi Network Application version 10.0.160. In this version (10.0.160), you no longer need to access the separate Hotspot Manager used in older versions (such as 5.x.y). Instead, guest vouchers can be created and managed directly within the main UniFi controller interface for the guest portal. Before generating guest vouchers, you must first properly configure the UniFi Guest Portal. Follow the steps below to create a guest voucher and enable login for Guest Wi-Fi clients.
Step1: Login
Login to the Ubiquiti Unifi Controller using the Ubiquiti Unifi username and password.

Step2: Site
Navigate to the specific site in the Ubiquiti UniFi Network Application for which you want to create the guest voucher (if your controller manages multiple sites). Please note that guest vouchers are site-specific: a voucher created under one site will not work on any other site. Therefore, you must ensure you are working in the correct site where the guest Wi-Fi network is configured and where the voucher needs to be used. Make sure the desired Ubiquiti UniFi site is selected before proceeding to create the voucher.
Create Vouchers
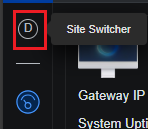
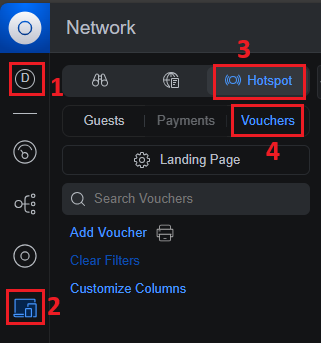
Step3: Hotspot Manager
Follow the steps shown below in the image to navigate to the Hotspot manager to add and/or manage the Guest Voucher.
Site Switcher => Select Site => Client Devices => Hotspot => Vouchers
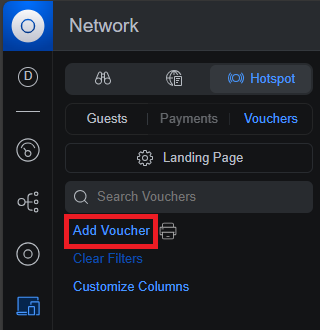
Step4: Click “Add Voucher”
Click “Add vouchers” and you will get a pop opened where different options are available for a voucher.
Step5: Voucher Options
Once you click “Add Voucher“, the configuration options (shown in the screenshot below) will appear. Enter the required details based on your preferences, then click “Add”. A new voucher will be generated instantly and will be ready for guest authentication. The individual options are described below the image.
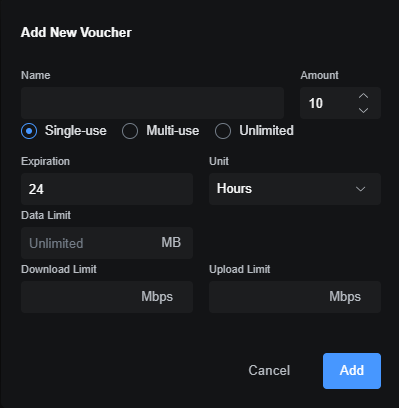
Step5.a: Create
This option is used to decide how many vouchers you want to create. You could create from 1 to as many as vouchers you need.
Step5.b: Quota
The quota will decide whether the created voucher can be used one time or multiple times or with multiple users. Details are as below
Single-use (One Time): One Time voucher can be used only once and by only one guest account.
Multi-Use: Multi-Use vouchers can be used multiple times till its validity but by only one guest account at one time.
Unlimited: Unlimited voucher can be used many times and by many guest accounts simultaneously.
Expiration: Expiration can be set to Days, Hours & Minutes depending upon requirement.
Step5.c: Bandwidth
Bandwidth usage of a guest account can be limited on the basis of download data, upload data and/or quota (Bytes). Details are as below.
Data Limit: A voucher can be created with the number of Bytes allowed i.e. How much data a guest account can use in MB or GB.
Download Limit: A voucher can be created with a Download data limit so that once the download limit is reached the user will not be able to access the internet.
Upload Limit: A voucher can be created with an Upload data limit so that once the Upload limit is reached the user will not be able to access the internet.
To use the voucher for a guest account you would need to set up the guest portal on the controller. See the article Ubiquiti Unifi Guest Portal Setup for stepwise details of setting up the guest portal. Also, Refer to Unifi Default Username Password if you are facing difficulties in log in to the controller.
EA00041