Scenario:
Make: Cisco ASA
Model: ASA 5506-X, ASA 5506 W-X, ASA 5508-X
Mode: CLI (Command Line Interface)
Description: In this article, we will discuss in details the stepwise method to configure failover in Cisco ASA Firewalls. We will use Command Line Interface for configuration of ASA Failover.
Physical Connectivity
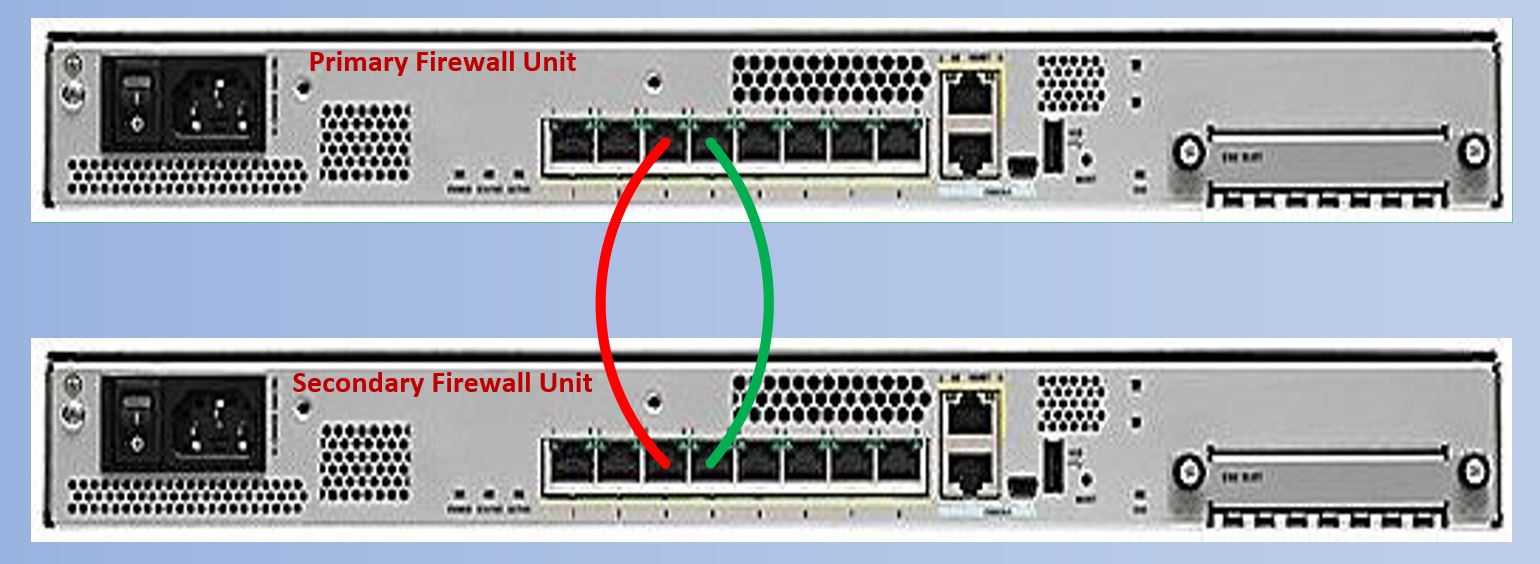
Step1: Connecting Failover Cables
Connect failover interfaces of both ASA units through straight cables as shown below in the image.
Configuration
Step2: Firewall Interface
By default interfaces of ASA remain administratively down so we would need to make them up.
edledge-asa# sh int ip bri
Interface IP-Address OK? Method Status Protocol
Virtual0 127.1.0.1 YES unset up up
GigabitEthernet1/1 unassigned YES DHCP down down
GigabitEthernet1/2 192.168.1.1 YES CONFIG down down
GigabitEthernet1/3 unassigned YES unset administratively down down
GigabitEthernet1/4 unassigned YES unset administratively down down
GigabitEthernet1/5 unassigned YES unset administratively down down
GigabitEthernet1/6 unassigned YES unset administratively down down
GigabitEthernet1/7 unassigned YES unset administratively down down
GigabitEthernet1/8 unassigned YES unset administratively down down
Internal-Control1/1 127.0.1.1 YES unset up up
Internal-Data1/1 unassigned YES unset up down
Internal-Data1/2 unassigned YES unset up up
Internal-Data1/3 unassigned YES unset up up
Internal-Data1/4 169.254.1.1 YES unset up up
Management1/1 unassigned YES unset down down
Step3: Failover Interfaces
Select the Failover interface and make them up. Let us suppose here we will use GigabitEthernet1/3 & GigabitEthernet1/4 as failover interfaces.
edledge-asa(config)# int gig 1/3
edledge-asa(config-if)# no shut
edledge-asa(config-if)# exit
edledge-asa#

edledge-asa(config)# int gig 1/4
edledge-asa(config-if)# no shut
edledge-asa(config-if)# exit
edledge-asa#
Step4: Failover interfaces Status
Check and ensure failover interfaces are up and connected.
edledge-asa# sh int ip bri
Interface IP-Address OK? Method Status Protocol
Virtual0 127.1.0.1 YES unset up up
GigabitEthernet1/1 unassigned YES DHCP down down
GigabitEthernet1/2 192.168.1.1 YES CONFIG down down
GigabitEthernet1/3 unassigned YES unset up up
GigabitEthernet1/4 unassigned YES unset up up
GigabitEthernet1/5 unassigned YES unset administratively down down
GigabitEthernet1/6 unassigned YES unset administratively down down
GigabitEthernet1/7 unassigned YES unset administratively down down
GigabitEthernet1/8 unassigned YES unset administratively down down
Internal-Control1/1 127.0.1.1 YES unset up up
Internal-Data1/1 unassigned YES unset up down
Internal-Data1/2 unassigned YES unset up up
Internal-Data1/3 unassigned YES unset up up
Internal-Data1/4 169.254.1.1 YES unset up up
Management1/1 unassigned YES unset down down
Step5: Failover Error Due To DHCP
Failover will not work if DHCP client is enabled on the interface so DHCP must be removed to get failover working. Please see the error message and interface DHCP status below.
edledge-asa(config)# failover
DHCP Client cannot be enabled on interface, Gi1/1(outside)
failover is not compatible with above configurations,
user must manually remove or fix them as instructed before failover can be enabled.


edledge-asa#sh int ip bri
Interface IP-Address OK? Method Status Protocol
Virtual0 127.1.0.1 YES unset up up
GigabitEthernet1/1 unassigned YES DHCP down down
GigabitEthernet1/2 192.168.1.1 YES CONFIG down down
GigabitEthernet1/3 unassigned YES unset administratively down down
GigabitEthernet1/4 unassigned YES unset administratively down down
GigabitEthernet1/5 unassigned YES unset administratively down down
GigabitEthernet1/6 unassigned YES unset administratively down down
GigabitEthernet1/7 unassigned YES unset administratively down down
GigabitEthernet1/8 unassigned YES unset administratively down down
Internal-Control1/1 127.0.1.1 YES unset up up
Internal-Data1/1 unassigned YES unset up down
Internal-Data1/2 unassigned YES unset up up
Internal-Data1/3 unassigned YES unset up up
Internal-Data1/4 169.254.1.1 YES unset up up
Management1/1 unassigned YES unset down down
Step6: Remove DHCP
Remove DHCP configuration on the interface to get the failover working. Here GigabitEthernet1/1 has the DHCP enabled. Please see the steps below to check the interface status and then removing the DHCP on GigabitEthernet1/1.
<confirm the dhcp status>
edledge-asa# sh run int gig 1/1
interface GigabitEthernet1/1
nameif outside
security-level 0
ip address dhcp setroute


<remove dhcp configuration>
edledge-asa# conf t
edledge-asa(config)# int gig 1/1
edledge-asa(config-if)# no ip address
edledge-asa(config-if)# exit
edledge-asa(config)# exit

<re-confirm dhcp status after change>
edledge-asa# sh run int gig 1/1
interface GigabitEthernet1/1
nameif outside
security-level 0
no ip address
Step7: Configure Failover Primary Unit
Configure Failover interfaces and IP details on Primary unit of ASA.
edledge-asa# conf t
edledge-asa(config)# failover
edledge-asa(config)# failover lan unit primary
edledge-asa(config)# failover lan interface FO GigabitEthernet1/3
INFO: Non-failover interface config is cleared on GigabitEthernet1/3 and its sub-interfaces
edledge-asa(config)# failover polltime unit 3 holdtime 9
edledge-asa(config)# failover polltime interface 1 holdtime 5
edledge-asa(config)# failover link Stateful_FO GigabitEthernet1/4
INFO: Non-failover interface config is cleared on GigabitEthernet1/4 and its sub-interfaces
edledge-asa(config)# failover interface ip FO 192.168.17.1 255.255.255.252 standby 192.168.17.2
edledge-asa(config)# failover interface ip Stateful_FO 192.168.17.5 255.255.255.252 standby 192.168.17.6
edledge-asa(config)# no failover wait-disable
Step8: Configure Failover Secondary Unit
Configure Failover interface and IP details on Secondary unit of ASA.
edledge-asa# conf t
edledge-asa(config)# failover
edledge-asa(config)# failover lan unit secondary
edledge-asa(config)# failover lan interface FO GigabitEthernet1/3
INFO: Non-failover interface config is cleared on GigabitEthernet1/3 and its sub-interfaces
edledge-asa(config)# failover polltime unit 3 holdtime 9
edledge-asa(config)# failover polltime interface 1 holdtime 5
edledge-asa(config)# failover link Stateful_FO GigabitEthernet1/4
INFO: Non-failover interface config is cleared on GigabitEthernet1/4 and its sub-interfaces
edledge-asa(config)# failover interface ip FO 192.168.17.1 255.255.255.252 standby 192.168.17.2
edledge-asa(config)# failover interface ip Stateful_FO 192.168.17.5 255.255.255.252 standby 192.168.17.6
edledge-asa(config)# no failover wait-disable
Step9: Mate Detection
Once the failover is configured and both cables are connected you could see the detection on the ASA console interface.
edledge-asa(config)#

Detected an Active mate
Beginning configuration replication from mate.
WARNING: Failover is enabled but standby IP address is not configured for this interface.
[ays_quiz id=’2′]
Testing
Step10: Failover Status
Check the failover status using the command below.
edledge-asa# sh failover state

State Last Failure Reason Date/Time
This host - Primary
Active None
Other host - Secondary
Standby Ready None

====Configuration State===
Sync Done
====Communication State===
Mac set
Failover is all set to work. If you are using FirePower services and SFR module then sometimes Unwanted ASA Failover Due To SFR Error may occur. Refer to the linked article to resolve the Unwanted ASA failover issue.
Source: Cisco, Knowledge Base, Internet
EA00043

