Scenario:
Make: Cisco
Model: ASA 5506-X, ASA 5506W-X, ASA 5508-X, ASA 5516-X and other Cisco ASA 5500-X Series firewalls
Mode: GUI [ASDM]
Version: ASA version 9.x or later & ASDM version 7.x or later
Description: In this article, we will discuss the step-by-step method to run a packet capture (PCAP) on a Cisco ASA firewall using the ASDM Packet Capture Wizard, and how to save it for analysis in Wireshark. You can also capture packets on Cisco ASA via CLI or SSH.
Introduction
A packet capture records the traffic passing through the firewall, so you can see exactly what is happening on the wire. It is one of the most useful tools to troubleshoot connectivity problems, check whether traffic reaches the ASA at all, verify NAT, or investigate suspicious activity. You can also run multiple captures at the same time to analyze different types of traffic on different interfaces.
In this example, we capture the traffic from a client on the inside interface with IP address 192.168.1.11 to a server on the internet with IP address 203.0.113.10.
Ingress vs Egress Capture
The wizard creates two captures: one on the interface where the traffic enters the ASA (ingress) and one on the interface where it leaves (egress). Comparing the two shows whether the ASA forwards, translates or drops the traffic.
| Capture | Interface in This Example | What It Shows |
| Ingress | inside | Traffic as it arrives at the ASA, before NAT (real IP addresses) |
| Egress | outside | Traffic as it leaves the ASA, after NAT (translated IP addresses) |
Important Note: If packets appear in the ingress capture but not in the egress capture, the ASA is dropping or not routing the traffic. Use packet-tracer to find out why.
Configure Packet Capture with the GUI or ASDM
Step 1: Login
Log in to the Cisco ASA via ASDM using your username and password.

Step 2: Open the Packet Capture Wizard
Click “Wizards” in the menu bar and then click “Packet Capture Wizard“, as shown in the image below.

Step 3: Click Next
The first page explains how the wizard works. Click “Next” to continue.

Step 4: Point of Ingress
Select the ingress interface (where the traffic enters the ASA), then enter the source and destination IP addresses and the protocol you want to capture. In this example, the ingress interface is inside, the source is 192.168.1.11, and the destination is 203.0.113.10.

Step 5: Point of Egress
Select the egress interface (where the traffic leaves the ASA), for example outside. The wizard fills in the addresses from the ingress page. If NAT applies to this traffic, change the source to the translated (public) IP address, because the egress capture sees the traffic after NAT.

Step 6: Buffers & Captures
The default settings work for most cases, so click “Next“. To capture more traffic, increase the buffer size. To keep capturing continuously, enable the circular buffer option, which overwrites the oldest packets when the buffer is full.

Step 7: Summary
Review the packet capture settings and click “Next“.

Step 8: Start the Capture
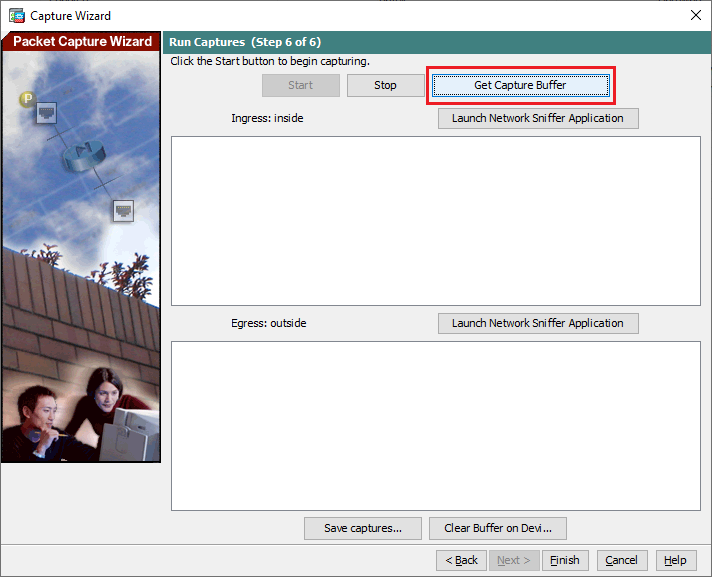
Click “Start” to begin the packet capture, as shown in the image below. Then generate the traffic you want to capture, for example by opening the website or running a ping from the client.

Step 9: View the Capture Buffer
Click “Capture Buffer” to view the captured packets for the ingress and egress interfaces.
Step 10: Save the Capture
Click “Save Captures” to save the capture for analysis, following the steps shown below. Choose the PCAP format if you want to open the file in Wireshark. The ASCII format only shows a text summary.

Step 11: Save the Ingress & Egress Captures
Save the ingress and egress captures as separate files, so you can compare them in Wireshark.

Step 12: Finish and Remove the Capture
Click “Finish” to close the wizard. Captures use memory on the ASA, so remove them once you have saved the files. You can do this from the CLI (in ASDM, go to Tools => Command Line Interface).
ciscoasa# show capture
ciscoasa# no capture <capture-name>
Tips for Cisco ASA Packet Capture
- Download without ASDM: you can also download a capture in PCAP format from a browser using https://<ASA-IP>/admin/capture/<capture-name>/pcap.
- Captures are temporary: captures are not saved in the configuration and are lost when the ASA reloads.
- Keep the filter specific: capture only the hosts and protocols you need, so the buffer does not fill up with unrelated traffic.
- No packets captured? Check that the interface and IP addresses are correct, that the traffic is actually being generated, and that NAT addresses are used on the egress side.
By following the steps above, you can capture packets on a Cisco ASA using ASDM, save them in PCAP format, and analyze them in Wireshark to troubleshoot connectivity and NAT issues.
Other Important Topics on ASA
- Configuring Packet Capture or PCAP on Cisco ASA Firewalls – CLI
- Cisco ASA Firewall Logging/Syslog Types & Configuration [GUI]
- Cisco ASA Logging/Syslog Time Sync Issue
- Configure SSH On Cisco ASA Firewall CLI
- Add Static ARP or MAC Binding on Cisco ASA Firewall
Disclaimer: This article is for educational purposes only and is not professional financial, medical, or legal advice. It may contain affiliate links, which earn us a small commission at no extra cost to you. See our Disclaimer and Affiliate Disclosure.
Article ID: EA00141