
Scenario:
Make: Cisco
Model: ASA 5506-X, ASA 5506 W-X, ASA 5508-X, Cisco ASA 5500 Series
Mode: GUI [ASDM]
Version: ASA version 9.x or later & ASDM version 7.x or later.
Description: In this article, we will discuss the stepwise method of how to do packet capture or get PCAP on Cisco ASA Firewalls via ASDM or GUI. We can do the PCAP or capture packets on Cisco ASA via CLI or SSH as well.
Introduction
The packet capture process is useful to troubleshoot connectivity problems or monitor suspicious activity. In addition, it is possible to create multiple captures in order to analyze different types of traffic on multiple interfaces.
Here considering we are looking to capture packets from the client on an inside interface with IP – 192.168.1.11 to outside 101.202.303.404
Configure Packet Capture with the GUI or ASDM
Step1: Login
Login onto the Cisco ASA via ASDM using username and password.

Step2: Packet Capture Wizard
Click “Wizards” and then click on “Packet Capture Wizard“, follow the steps as shown below in the image.

Step3: Click Next
The first page is the details of how to do it, click “Next” to proceed further.

Step4: Point of Ingress
Select the ingress interface and source/destination IP address and the protocol we want to capture. Follow the steps as shown below in the image.

Step5: Point of Egress
Select the Egress interface, subnets and protocols. You could leave this as it is unless you want to capture packets in both directions.

Step6: Buffers & Captures
Leave this page on default settings and click “Next” or Make changes as per your requirement and then click “Next” to proceed.

Step7: Summary
Review the packet capture settings and click “Next” to proceed further.

Step8: Run Capture
Click “Start” to start the packet capture as shown below in the image.

Step9: Capture Buffer
Click “Capture Buffer” and it will show the captured packets.
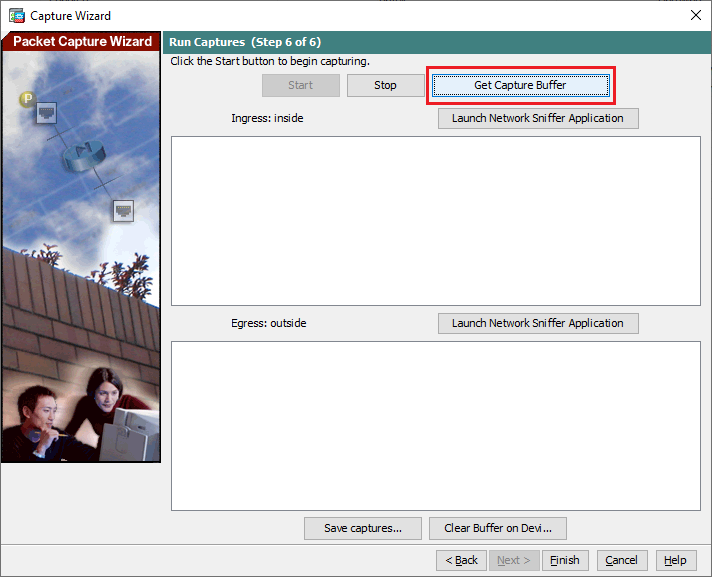
Step10: Save Capture
You could save the capture for analysis. Follow the steps shown below.

Step11: Save Ingress & Egress
Save the Ingress & Egress packets for future analysis.

Finally, click “Finish” to end the packet capture and close the wizard.
Other Important Topics on ASA
- Cisco ASA Firewall Logging/Syslog Types & Configuration [GUI]
- Cisco ASA Logging/Syslog Time Sync Issue
- Configure Redundant or Backup ISP Link on Cisco ASA – CLI
- Add Static ARP or MAC Binding on Cisco ASA Firewall
- Configure SSH On Cisco ASA Firewall CLI
Source: Knowledge Base, Internet, Cisco
Disclaimer: This article is for educational purposes only and is not professional financial, medical, or legal advice. It may contain affiliate links, which earn us a small commission at no extra cost to you. See our Disclaimer and Affiliate Disclosure.
Article ID: EA00141