Scenario:
Make: Cisco
Model: ASA 5506-X, ASA 5506W-X, ASA 5508-X, ASA 5500-X Series
Mode: GUI [ASDM]
Description: In this article, we will discuss the different logging destinations on Cisco ASA and how to configure logging and syslog using ASDM. If your log timestamps are wrong, refer to our article on the Cisco ASA Logging/Syslog Time Sync Issue.
What Is Syslog?
System logging (syslog) is a method of collecting messages from devices and sending them to a server running a syslog daemon. Logging to a central syslog server helps aggregate logs and alerts from many devices in one place. Cisco devices can send their log messages to a UNIX-style syslog service, which accepts the messages and stores them in files or prints them according to a simple configuration file. This form of logging provides protected long-term storage for logs, which are useful both in routine troubleshooting and in incident handling.
Cisco ASA syslog messages begin with a percent sign (%) and are structured as follows:
%ASA-Level-Message_number: Message_textFor example, in the message below, 6 is the severity level (informational) and 302013 is the message number:
%ASA-6-302013: Built outbound TCP connection ...Syslog Severity Levels
Syslog messages are divided into eight severity levels, from 0 (most severe) to 7 (least severe). When you choose a level for a logging destination, the ASA sends messages of that level and every more severe level. For example, choosing warnings (4) sends levels 0 to 4. You can also assign custom colours to each severity level to make them easier to tell apart in the ASDM log viewers.
| Level Number | Severity Level | Description |
|---|---|---|
| 0 | emergencies | System is unusable |
| 1 | alerts | Immediate action is needed |
| 2 | critical | Critical conditions |
| 3 | errors | Error conditions |
| 4 | warnings | Warning conditions |
| 5 | notifications | Normal but significant conditions |
| 6 | informational | Informational messages only |
| 7 | debugging | Debugging messages only |
Note: The ASA and ASASM do not generate syslog messages with a severity level of zero (emergencies). This level is provided in the logging command for compatibility with the UNIX syslog feature but is not used by the ASA.
Syslog Configuration on Cisco ASA via ASDM
Step1: Login
Log in to the ASA through ASDM using your username and password.

Step2: Enable Logging
Go to Configuration > Device Management > Logging > Logging Setup, check Enable logging, and click Apply. Without this, the ASA will not send messages to any of the destinations below.
Step3: Logging Filters
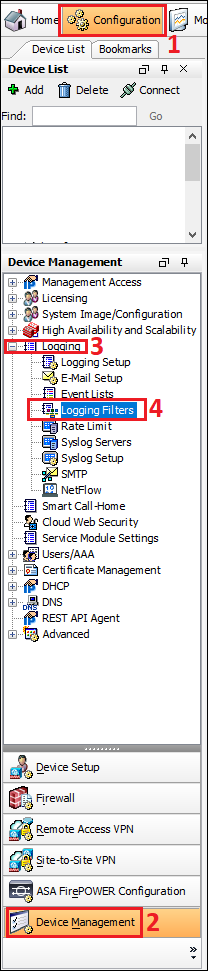
Go to Configuration > Device Management > Logging > Logging Filters, as shown below in the image.
Step4: Choose a Logging Destination
Select the logging destination you want to configure and click Edit to choose its severity level. The available logging destinations are:
- Console port
- ASDM
- Internal buffer
- Telnet and SSH sessions
- SNMP trap
- Syslog servers
Each destination is explained below.
Configuring Logging Destinations
Console Port
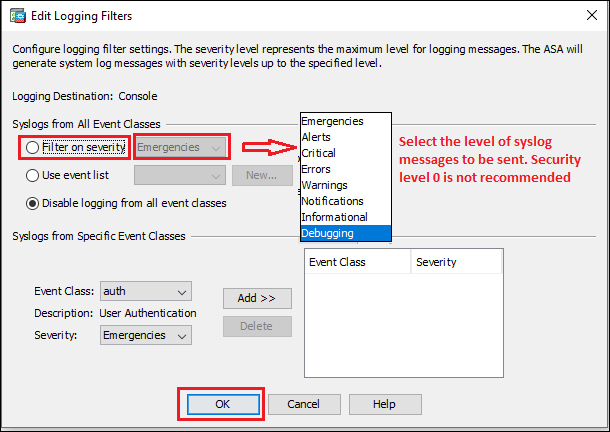
Syslog messages can be sent to the console port for monitoring. Follow the steps shown below in the image to send syslog messages to the console port.
Tip: Console logging is slow and can increase CPU load on a busy firewall. Keep the console at a low level such as critical, and avoid debugging in production.
You can also receive syslog messages by email. First, add your SMTP server under Configuration > Device Management > Logging > SMTP. Then, under E-Mail Setup, enter the source email address and the destination email address, and choose the syslog severity level from the drop-down list. Use a low level such as critical or alerts, otherwise the mailbox can be flooded.

ASDM
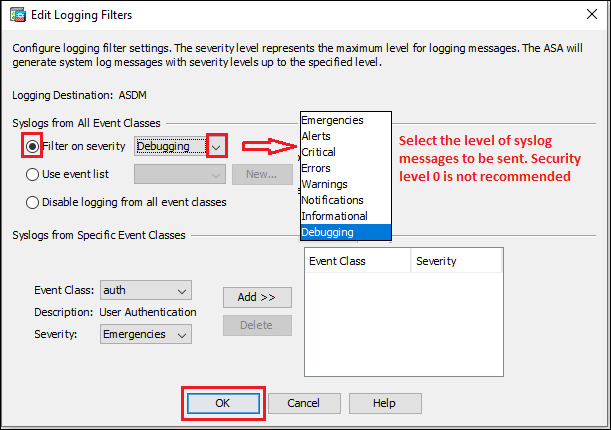
Syslog messages can be monitored in real time from the ASDM log viewer. Follow the steps shown below in the image.
Internal Buffer
The internal buffer serves as temporary storage for syslog messages in the ASA’s memory. Define the internal buffer size, then follow the steps shown below in the image to send syslog messages to the internal buffer. The buffer is circular, so the oldest messages are overwritten when it is full, and its contents are lost when the ASA reboots. If you need to keep these logs, you can save the buffer to flash or an FTP server.

Telnet and SSH Sessions
To send syslog messages to a Telnet or SSH session, follow the steps shown below. Make sure Telnet or SSH access is already configured on the ASA.

SNMP Trap
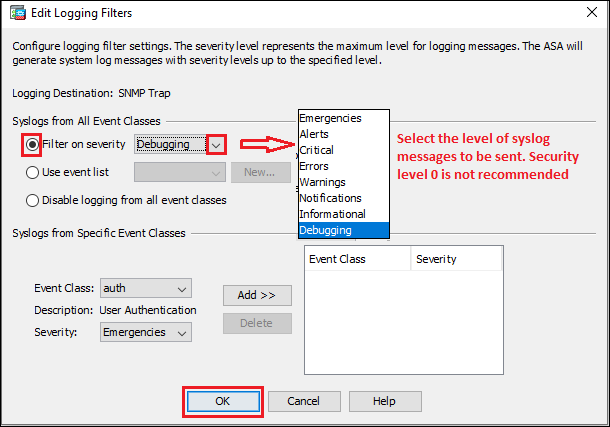
First, configure SNMP on the Cisco ASA. Then follow the steps shown below in the image to send syslog messages as SNMP traps.
Syslog Servers
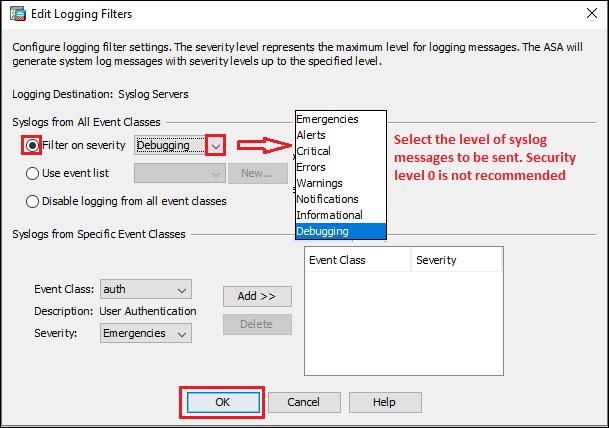
Go to Configuration > Device Management > Logging > Syslog Servers and click Add. Choose the interface the server is reachable through, enter the server’s IP address, and select the protocol and port (UDP 514 by default, or TCP 1470 by default). Then follow the steps shown below in the image to set the severity level for syslog servers.
Tip: If you use TCP and the syslog server becomes unreachable, the ASA can stop allowing new connections through the firewall. To prevent this, check Allow user traffic to pass when TCP syslog server is down on the Syslog Servers page.
Save the Configuration
After clicking Apply on each page, click Save in the ASDM toolbar (or File > Save Running Configuration to Flash). Otherwise, your logging settings will be lost when the ASA reboots.
Equivalent CLI Commands
If you prefer the CLI, the commands below match the ASDM settings above. Replace the interface names, IP addresses, and email addresses with your own.
logging enable
logging timestamp
logging console critical
logging asdm informational
logging buffer-size 1048576
logging buffered warnings
logging monitor debugging
logging history warnings
logging trap informational
logging host inside 192.168.1.50
logging permit-hostdown
smtp-server 192.168.1.25
logging from-address asa@example.com
logging recipient-address admin@example.com level critical
logging mail critical
write memory
In this example, logging monitor applies to Telnet and SSH sessions (enter terminal monitor in the session to view them), logging history applies to SNMP traps, and logging trap applies to syslog servers.
Conclusion
You can now configure Cisco ASA logging and syslog using any of the methods described above. For most networks, sending informational logs to a central syslog server and keeping a smaller internal buffer for quick troubleshooting is a good starting point.
Other Topics on Cisco ASA
- Cisco ASA Software Upgrade/Downgrade – CLI
- Configure IP SLA on Cisco ASA Firewalls
- Configure Redundant or Backup ISP Link on Cisco ASA – CLI
- Add Static ARP or MAC Binding on Cisco ASA Firewall
- How to Configure VPN Between Microsoft Azure and Cisco ASA
Source: Knowledge Base, Cisco Community
Disclaimer: This article is for educational purposes only and is not professional financial, medical, or legal advice. It may contain affiliate links, which earn us a small commission at no extra cost to you. See our Disclaimer and Affiliate Disclosure.
Article ID: EA00138