

Scenario:
Make: Ubiquiti
Model: USG Pro, USG Pro 3, USG Pro 4 etc
Version: 4.3.x or above
Mode: GUI
Description: This article is to discuss and show a stepwise method to configure a Site-to-Site IPSec VPN tunnel on Ubiquiti Unifi Security Gateway device [USG Pro].
Ubiquiti Unifi Security Gateway devices support three types of Site-to-Site VPN tunnel.
1. Auto IPSec VTI – Auto IPsec VTI is to create a site-to-site VPN with another USG that is managed on a different site within this same UniFi controller. If either side of the tunnel on Auto is using USG firmware 4.2.x, then the auto site-to-site option will fall back to OpenVPN.
2. Manual IPsec – Manual IPsec is to create a site-to-site VPN tunnel to an externally managed USG, EdgeRouter, or another vendor’s offering which supports IPsec.
3. Open VPN – OpenVPN is similar to Manual IPsec, in that it is to create a tunnel to an externally managed device, just using OpenVPN instead of IPsec.
Ubiquiti Unifi recommend using IPSec VPN Tunnel
Configuration
Step1: Login
Log in to the controller.

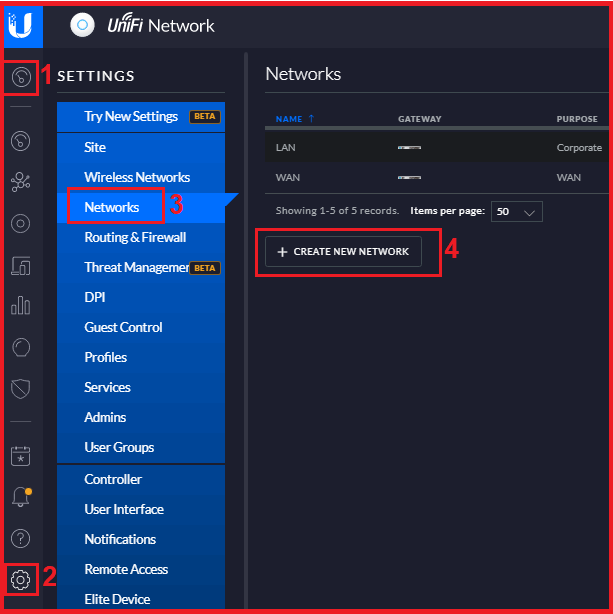
Step2: Navigate To Network
Into the “Site” page, inside the “Settings”, access the “Network” and then click “Create New Network” as shown below in the image.
Step3: Configure IPSec
Configure the IPSec by filling in the required details as shown below in the image.
3.1. Name – Name the VPN Tunnel, this could be anything as per you.
3.2. Purpose – Select “Site-to-Site VPN”
3.3. VPN Type – Select “Manual IPSec”
3.4. Enabled – Enable Site to Site VPN
3.5. Remote Subnets – Add the subnet of the remote site which will be allowed.
3.6. Peer IP – Add the Peer IP i.e. Public IP of the remote site.
3.7. Local WAN IP – Add the Public IP of the Local site
3.8. Pre Shared Key – Add PSK, same will be used at far/remote site.
3.9. IPSec Profile – Keep the IPSec Profile as Customized

Step4: Advanced Options
Click the Advanced Option to configure Profile Phase
4.1. Key Exchange Version – Select the IKE version. Two options are available IKEv1 and IKEv2.
4.2. Encryption – Select encryption AES-128, AES-256 or 3DES
4.3. Hash – Select the Hash, SHA-1 or MD6
4.4. DH Group – Select the required DH Group, 2, 5, 14, 15 etc
4.5. PFS – Enable or Disable PFS as per requirement.
4.6. Dynamic routing – Generally disabled, enable it if you are using Dynamic Routing
4.7. Save – Finally Save the configuration.

The Site-to-Site VPN Tunnel is configured on Ubiquiti Unifi Device.
Refer to the attached article if you are looking to upgrade the firmware of the Unifi Controller. Sometimes we need to Factory reset Unifi Secure Gateway Pro-4 to its default settings. Also, find the steps of the initial configuration of USG Pro-4 via GUI and CLI.
EA00086
Does this configuration need to be done on both sites, or just one site? I am assuming you do the same thing on the 2nd site, just what is “local” and what is “remote” is switched. Correct?
Yes, configuration needs to be done on the other side as well. You are absolutely correct the “local” and “remote” objects/subnets will be interchanged/switched on the other end.
Thanks for the informative sharing.
Just want to know, do we need to configure any routing or firewall policy while configuring Site to Site VPN?
It depends on the type of configuration you need. A basic Site-to-Site tunnel would not require any special routing or firewall policy. The subnets which will be added in the tunnel configuration will be routed over the tunnel automatically.