Scenario:
Make: Ubiquiti
Model: Ubiquiti Unifi Security Gateway Pro-4
Mode: GUI (Graphical User Interface)
Version: 6.5.55
Description: In this article, we will discuss a detailed stepwise method of how to configure port forwarding & add a static route in Ubiquiti Unifi Security Gateway Pro-4. Refer to the article if you are looking to configure SPAN or Port Mirroring On Ubiquiti Unifi USG Switches.
Port-Forwarding & Static Routes are the basic configurations that we need to add to a security gateway or Firewall. Follow the steps mentioned below to add port forwarding & static routes in USG.
Port Forwarding Configuration
Step1: Login
Login onto the controller. If you have not set the password yet then use Unifi default username & password.
Step2: Advanced Features
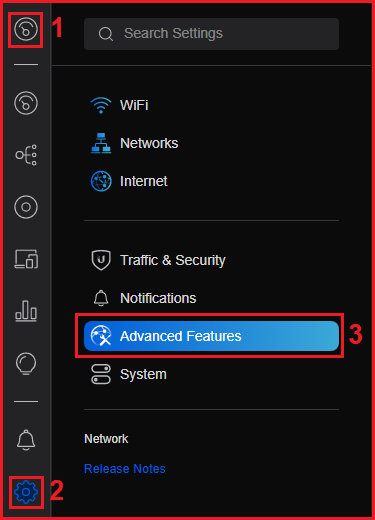
Navigate to the “Site” and then click “Settings” to access the “Advanced Features” page. Follow the steps shown below in the image.
Step3: Advanced Gateway Settings
On the Advanced Features page scroll down and click on “Advanced Gateway Settings“, as shown below in the image.
Step4: Port Forwarding
In the Advanced Gateway Settings Click “Create New Port Forwarding“.
Step5: Add Details
Add the details in the port forwarding tab, refer to the image shown below as an example.
Adding Static Route
Follow steps 1 to 3 same as mentioned above in the port forwarding configuration details.
Step4: Static Route
In the Advanced Gateway Settings Click “Create New Static Route“. Follow the steps shown below.
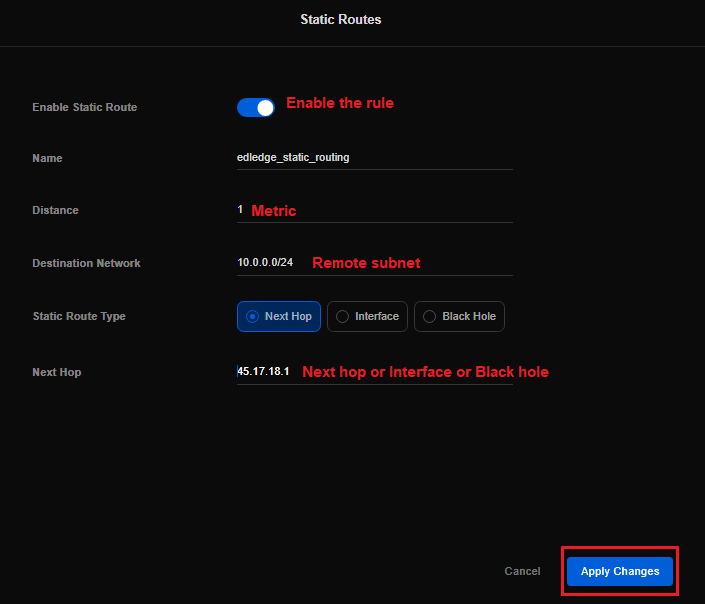
Step5: Add Details
Add the details in the static route, refer to the image as an example.
By using the above steps you could configure port forwarding and add a static route in Ubiquiti Unifi Security Gateway.
Other important articles on Ubiquiti Unifi Security Gateway [USG]
- Site-to-Site IPSec VPN Configuration On Ubiquiti Unifi USG
- Ubiquiti USG Pro-4 Initial Setup – GUI Method
- Factory Reset Ubiquiti Secure Gateway Pro-4
Source: Knowledge Base, Lab, Ubiquiti
EA00108


